![[Updated] 2024 Approved Diving Into Zoom Breakout Room Setups](https://thmb.techidaily.com/2738dcb65655ca3023848f9ec7026a9cce211e70815a31f4f65d2f9ea9ded629.jpg)
"[Updated] 2024 Approved Diving Into Zoom Breakout Room Setups"
Diving Into Zoom Breakout Room Setups
How to Use Zoom Breakout Rooms


Richard Bennett
Mar 27, 2024• Proven solutions
How to Use Zoom Breakout Rooms
Maximizing the team’s efficiency is the ultimate goal of every team manager, but large meetings can often turn unproductive because members of the team don’t have enough time to communicate. In addition, multiple speakers cannot speak at the same time during a meeting, which is why it is better to create a separate space where different team members can talk without interruption.
Zoom application offers a perfect solution to this problem by enabling participants to join breakout rooms where they can discuss particular tasks in private.
You are at the right place if you are just getting started with Zoom. Because in this tutorial we are going to show you how to use Zoom breakout rooms during meetings you host on this app.
- Part 1: What is a Breakout Room in Zoom?
- Part 2: How to Create a Breakout Room?
- Part 3: How to Manage Breakout Rooms?
- Part 4: How to Record Breakout Rooms meetings?
- Part 5: Troubleshooting Zoom Breakout Rooms

Part 1: What is a Breakout Room in Zoom?
A breakout room is a sub-room that can be created during a meeting and you can split a meeting into up to 50 breakout sessions. The app allows you to choose if you want to create these sub-rooms and split the participants in a meeting into smaller groups automatically or manually.
You must purchase the Large Meeting add-on if you would like to create 50 breakout sessions that have as many as two hundred participants. Each participant in a breakout session has complete control over video, audio and screen sharing options, and they can record each breakroom locally. In case the meeting’s host has enabled the cloud recording feature, Zoom will only record the main room while giving the participants the option to record the breakout room separately.
Part 2: How to Create a Breakout Room?
1. Enable Breakout Rooms in Zoom
Creating a breakout room requires you to install the Zoom desktop client and to create an account on Zoom. Once you complete these two steps, you should sign in to your account and choose the Account Settings option from the Account Management menu. Locate the Breakout Room feature that is located in the Meeting tab and if the feature is disabled you should click on it to toggle it on.
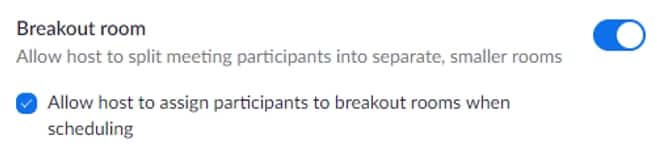
Hosts who would like to assign participants to breakout rooms while scheduling a meeting should click on the Allow host to assign participants to breakout rooms when scheduling a checkbox. Clicking on the Lock icon will make the breakout room setting mandatory for all users on your Zoom account.
Besides using the breakout rooms during meetings, you can also enable them in different groups you create. Head over to the User Management menu, click on the Group Management option and then select the group in which you would like to enable breakout rooms.
Click on the Settings tab, navigate to the Meetings tab and click on the Breakout Room feature. You can then proceed to enable this option the same way you would enable it if you were setting up a regular Zoom meeting.
Zoom also allows account administrators and account members to activate the breakout room feature. You should click on the Settings option if you are accessing a Zoom account as an account member or go to the Account Management and pick the Account Settings option if you are accessing a Zoom account as an account administrator.
Afterward, you should just enable the breakout room option from the Meetings tab and decide if you want to pre-assign members to particular rooms while scheduling a meeting.
2. Create Breakout Rooms in Zoom Meeting
Once the breakout room feature is enabled, you should start a new meeting and click on the Breakout Room icon in the Zoom’s toolbar. You will be prompted to set the number of rooms you would like to create for the meeting and choose if you want to assign participants to breakout rooms automatically or manually.
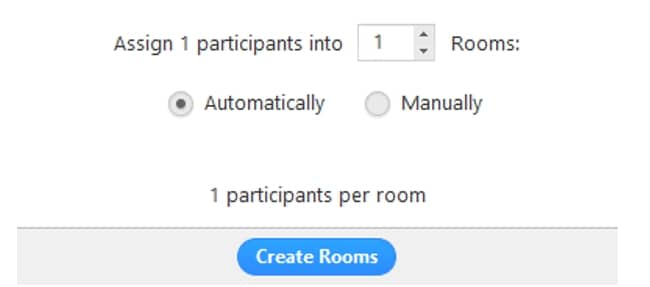
Click on the Create Rooms button to complete the process and proceed to fine-tune the settings for each room.
Part 3: How to Manage Breakout Rooms
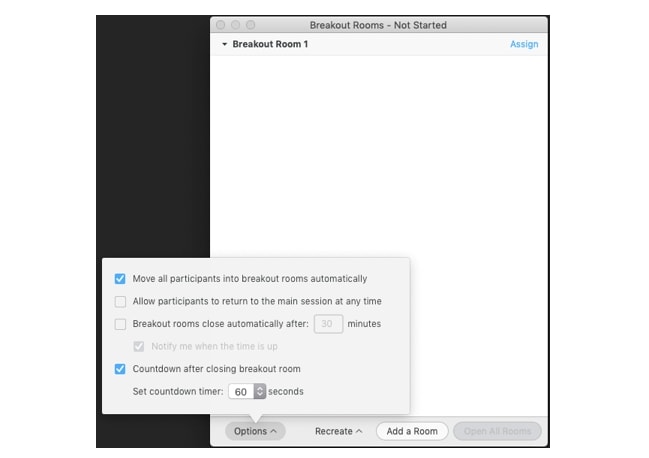
Zoom offers several options that make managing breakout rooms easier, so after you create breakout rooms for a meeting you should click on the Options icon.
You can then decide if you want to move all participants into breakout rooms automatically, allow participants to return to the main session at any time or set the timeframe after which all breakout rooms are going to close. Optionally, you can also activate a countdown after a breakout room is closed and specify its duration.
Click on the Open all Rooms button to start assigning participants to different breakout rooms. You should then click on the Assign button next to a particular room and select all the participants you wish to add to that room. Keep in mind that the Assign button will be replaced with the number of participants each room has as soon as you add the first participant to them.
Zoom also allows you to move participants from one room to another after you assigned them to one of the breakout rooms you created. You will be able to see Move and Exchange options next to the names of all participants you added to a room. Click on the Move option if you want to move a participant from one room to another or click on the Exchange option if you want to switch places of two participants who were added to different rooms. In addition, you can delete all breakout rooms you created and make new ones by clicking on the Recreate button or delete a room you selected.
Part 4: Recording Zoom Breakout Rooms
The participants who join a breakout room will have several options at their disposal, so that they can mute/unmute other participants, start or stop a video, see the full list of participants, share their screens, chat or record a breakout session.
Participants cannot start recording a breakout room until they are granted permission by the host. Ideally, hosts should enable this option before opening the rooms, although they can grant permission to record by entering a room and enabling the Local Recording option.
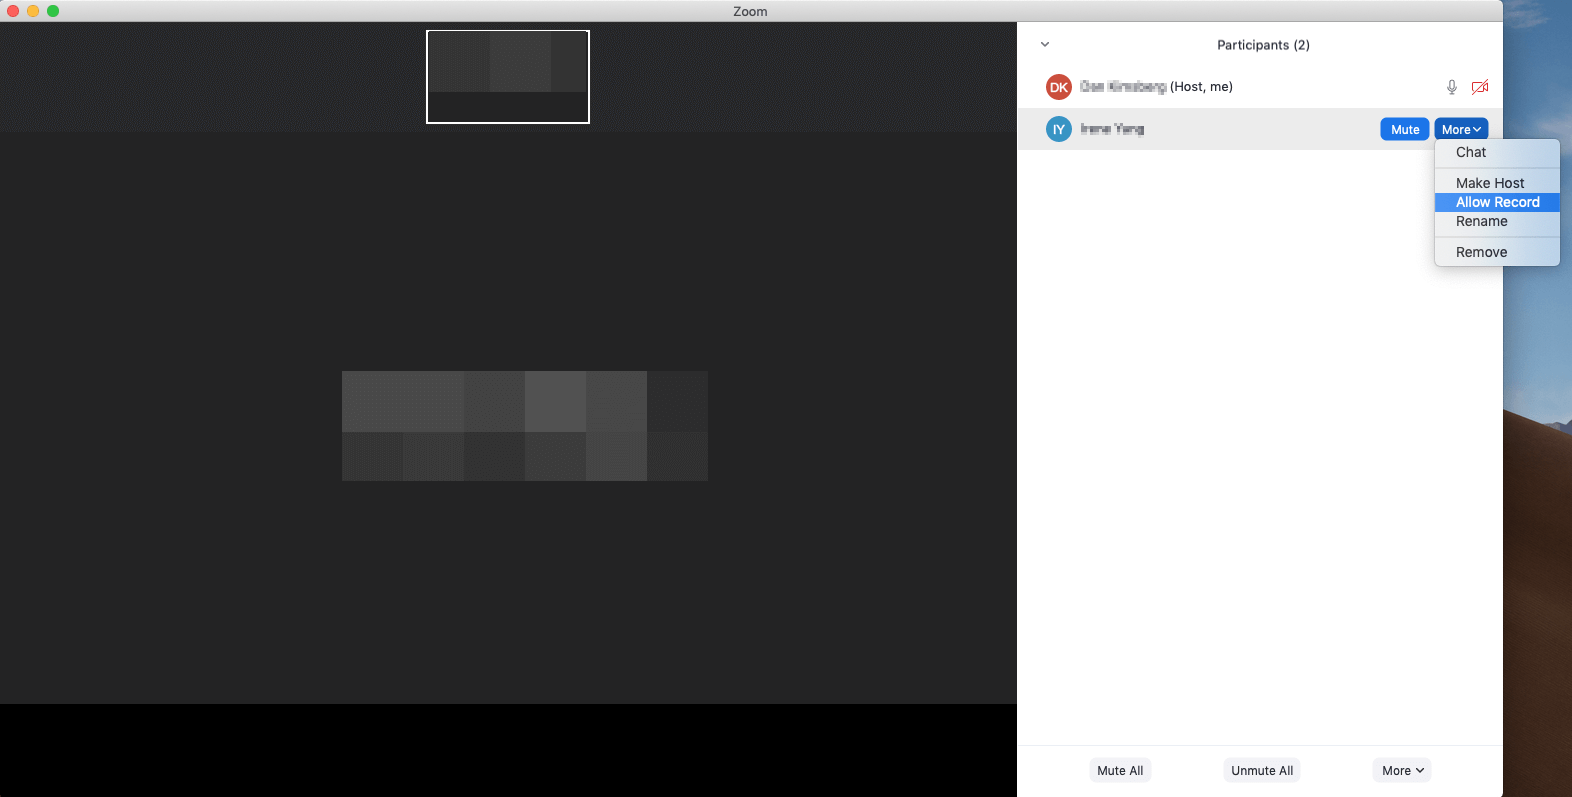
Afterward, you just have to click on the Record button and the activities within your breakout room will be recorded. Zoom allows you to pause or stop a recording at any moment and you should just click on the corresponding button in the meeting toolbar to perform this action.
Keep in mind that you may lose the video you’re recording if the recording process is interrupted in any other way other than clicking on the Stop or Pause buttons.
We’ve written an article about Zoom meeting, if you’ve met any questions about it, you can check it here: Record Zoom Meeting Guide .
Part 5: Troubleshooting Zoom Breakout Rooms
Even though creating and managing breakout rooms shouldn’t be too difficult, you may still experience problems. Let’s take a look at some of the most common issues Zoom users encounter with breakout rooms.
1. Why can’t I join a Zoom Breakout Room?
Only users with access to Zoom desktop client, Zoom mobile app and H.323/SIP devices can join breakout rooms. You won’t be able to join a breakout room if you are using Zoom from a web browser.
2. Can I communicate with participants in Breakout Session?
Hosts can only communicate with participants of a single breakout room, which means that they have to join a room to which a particular participant was assigned in order to communicate with them.
3. Can participants switch between breakout rooms after a session starts?
No, this is not an option. However, if you remove a participant from the meeting, you will be able to assign them to a new breakout room after they rejoin the meeting.
4. What happens if I miss or close an invitation to a breakout session?
Participants can join a breakout session before it ends. Join Breakout Session icon will remain active as long as the meeting is in progress.
Conclusion
Dividing a meeting into smaller sessions that have fewer participants can boost the productivity of an entire team. Zoom’s breakout rooms offer an easy way to accomplish this by allowing the host to create up to fifty different rooms that can have as many as 200 participants. Setting up breakout rooms with Zoom is a straightforward process that is not going to take more than a few moments of your time. Do you use Zoom’s breakout rooms feature? Leave a comment below and share your experiences with us.
Richard Bennett
Richard Bennett is a writer and a lover of all things video.
Follow @Richard Bennett
Richard Bennett
Mar 27, 2024• Proven solutions
How to Use Zoom Breakout Rooms
Maximizing the team’s efficiency is the ultimate goal of every team manager, but large meetings can often turn unproductive because members of the team don’t have enough time to communicate. In addition, multiple speakers cannot speak at the same time during a meeting, which is why it is better to create a separate space where different team members can talk without interruption.
Zoom application offers a perfect solution to this problem by enabling participants to join breakout rooms where they can discuss particular tasks in private.
You are at the right place if you are just getting started with Zoom. Because in this tutorial we are going to show you how to use Zoom breakout rooms during meetings you host on this app.
- Part 1: What is a Breakout Room in Zoom?
- Part 2: How to Create a Breakout Room?
- Part 3: How to Manage Breakout Rooms?
- Part 4: How to Record Breakout Rooms meetings?
- Part 5: Troubleshooting Zoom Breakout Rooms
Part 1: What is a Breakout Room in Zoom?
A breakout room is a sub-room that can be created during a meeting and you can split a meeting into up to 50 breakout sessions. The app allows you to choose if you want to create these sub-rooms and split the participants in a meeting into smaller groups automatically or manually.
You must purchase the Large Meeting add-on if you would like to create 50 breakout sessions that have as many as two hundred participants. Each participant in a breakout session has complete control over video, audio and screen sharing options, and they can record each breakroom locally. In case the meeting’s host has enabled the cloud recording feature, Zoom will only record the main room while giving the participants the option to record the breakout room separately.
Part 2: How to Create a Breakout Room?
1. Enable Breakout Rooms in Zoom
Creating a breakout room requires you to install the Zoom desktop client and to create an account on Zoom. Once you complete these two steps, you should sign in to your account and choose the Account Settings option from the Account Management menu. Locate the Breakout Room feature that is located in the Meeting tab and if the feature is disabled you should click on it to toggle it on.
Hosts who would like to assign participants to breakout rooms while scheduling a meeting should click on the Allow host to assign participants to breakout rooms when scheduling a checkbox. Clicking on the Lock icon will make the breakout room setting mandatory for all users on your Zoom account.
Besides using the breakout rooms during meetings, you can also enable them in different groups you create. Head over to the User Management menu, click on the Group Management option and then select the group in which you would like to enable breakout rooms.
Click on the Settings tab, navigate to the Meetings tab and click on the Breakout Room feature. You can then proceed to enable this option the same way you would enable it if you were setting up a regular Zoom meeting.
Zoom also allows account administrators and account members to activate the breakout room feature. You should click on the Settings option if you are accessing a Zoom account as an account member or go to the Account Management and pick the Account Settings option if you are accessing a Zoom account as an account administrator.
Afterward, you should just enable the breakout room option from the Meetings tab and decide if you want to pre-assign members to particular rooms while scheduling a meeting.
2. Create Breakout Rooms in Zoom Meeting
Once the breakout room feature is enabled, you should start a new meeting and click on the Breakout Room icon in the Zoom’s toolbar. You will be prompted to set the number of rooms you would like to create for the meeting and choose if you want to assign participants to breakout rooms automatically or manually.
Click on the Create Rooms button to complete the process and proceed to fine-tune the settings for each room.
Part 3: How to Manage Breakout Rooms
Zoom offers several options that make managing breakout rooms easier, so after you create breakout rooms for a meeting you should click on the Options icon.
You can then decide if you want to move all participants into breakout rooms automatically, allow participants to return to the main session at any time or set the timeframe after which all breakout rooms are going to close. Optionally, you can also activate a countdown after a breakout room is closed and specify its duration.
Click on the Open all Rooms button to start assigning participants to different breakout rooms. You should then click on the Assign button next to a particular room and select all the participants you wish to add to that room. Keep in mind that the Assign button will be replaced with the number of participants each room has as soon as you add the first participant to them.
Zoom also allows you to move participants from one room to another after you assigned them to one of the breakout rooms you created. You will be able to see Move and Exchange options next to the names of all participants you added to a room. Click on the Move option if you want to move a participant from one room to another or click on the Exchange option if you want to switch places of two participants who were added to different rooms. In addition, you can delete all breakout rooms you created and make new ones by clicking on the Recreate button or delete a room you selected.
Part 4: Recording Zoom Breakout Rooms
The participants who join a breakout room will have several options at their disposal, so that they can mute/unmute other participants, start or stop a video, see the full list of participants, share their screens, chat or record a breakout session.
Participants cannot start recording a breakout room until they are granted permission by the host. Ideally, hosts should enable this option before opening the rooms, although they can grant permission to record by entering a room and enabling the Local Recording option.
Afterward, you just have to click on the Record button and the activities within your breakout room will be recorded. Zoom allows you to pause or stop a recording at any moment and you should just click on the corresponding button in the meeting toolbar to perform this action.
Keep in mind that you may lose the video you’re recording if the recording process is interrupted in any other way other than clicking on the Stop or Pause buttons.
We’ve written an article about Zoom meeting, if you’ve met any questions about it, you can check it here: Record Zoom Meeting Guide .
Part 5: Troubleshooting Zoom Breakout Rooms
Even though creating and managing breakout rooms shouldn’t be too difficult, you may still experience problems. Let’s take a look at some of the most common issues Zoom users encounter with breakout rooms.
1. Why can’t I join a Zoom Breakout Room?
Only users with access to Zoom desktop client, Zoom mobile app and H.323/SIP devices can join breakout rooms. You won’t be able to join a breakout room if you are using Zoom from a web browser.
2. Can I communicate with participants in Breakout Session?
Hosts can only communicate with participants of a single breakout room, which means that they have to join a room to which a particular participant was assigned in order to communicate with them.
3. Can participants switch between breakout rooms after a session starts?
No, this is not an option. However, if you remove a participant from the meeting, you will be able to assign them to a new breakout room after they rejoin the meeting.
4. What happens if I miss or close an invitation to a breakout session?
Participants can join a breakout session before it ends. Join Breakout Session icon will remain active as long as the meeting is in progress.
Conclusion
Dividing a meeting into smaller sessions that have fewer participants can boost the productivity of an entire team. Zoom’s breakout rooms offer an easy way to accomplish this by allowing the host to create up to fifty different rooms that can have as many as 200 participants. Setting up breakout rooms with Zoom is a straightforward process that is not going to take more than a few moments of your time. Do you use Zoom’s breakout rooms feature? Leave a comment below and share your experiences with us.
Richard Bennett
Richard Bennett is a writer and a lover of all things video.
Follow @Richard Bennett
Richard Bennett
Mar 27, 2024• Proven solutions
How to Use Zoom Breakout Rooms
Maximizing the team’s efficiency is the ultimate goal of every team manager, but large meetings can often turn unproductive because members of the team don’t have enough time to communicate. In addition, multiple speakers cannot speak at the same time during a meeting, which is why it is better to create a separate space where different team members can talk without interruption.
Zoom application offers a perfect solution to this problem by enabling participants to join breakout rooms where they can discuss particular tasks in private.
You are at the right place if you are just getting started with Zoom. Because in this tutorial we are going to show you how to use Zoom breakout rooms during meetings you host on this app.
- Part 1: What is a Breakout Room in Zoom?
- Part 2: How to Create a Breakout Room?
- Part 3: How to Manage Breakout Rooms?
- Part 4: How to Record Breakout Rooms meetings?
- Part 5: Troubleshooting Zoom Breakout Rooms
Part 1: What is a Breakout Room in Zoom?
A breakout room is a sub-room that can be created during a meeting and you can split a meeting into up to 50 breakout sessions. The app allows you to choose if you want to create these sub-rooms and split the participants in a meeting into smaller groups automatically or manually.
You must purchase the Large Meeting add-on if you would like to create 50 breakout sessions that have as many as two hundred participants. Each participant in a breakout session has complete control over video, audio and screen sharing options, and they can record each breakroom locally. In case the meeting’s host has enabled the cloud recording feature, Zoom will only record the main room while giving the participants the option to record the breakout room separately.
Parental Control Software
## Part 2: How to Create a Breakout Room?1. Enable Breakout Rooms in Zoom
Creating a breakout room requires you to install the Zoom desktop client and to create an account on Zoom. Once you complete these two steps, you should sign in to your account and choose the Account Settings option from the Account Management menu. Locate the Breakout Room feature that is located in the Meeting tab and if the feature is disabled you should click on it to toggle it on.
Hosts who would like to assign participants to breakout rooms while scheduling a meeting should click on the Allow host to assign participants to breakout rooms when scheduling a checkbox. Clicking on the Lock icon will make the breakout room setting mandatory for all users on your Zoom account.
Besides using the breakout rooms during meetings, you can also enable them in different groups you create. Head over to the User Management menu, click on the Group Management option and then select the group in which you would like to enable breakout rooms.
Click on the Settings tab, navigate to the Meetings tab and click on the Breakout Room feature. You can then proceed to enable this option the same way you would enable it if you were setting up a regular Zoom meeting.
Zoom also allows account administrators and account members to activate the breakout room feature. You should click on the Settings option if you are accessing a Zoom account as an account member or go to the Account Management and pick the Account Settings option if you are accessing a Zoom account as an account administrator.
Afterward, you should just enable the breakout room option from the Meetings tab and decide if you want to pre-assign members to particular rooms while scheduling a meeting.

2. Create Breakout Rooms in Zoom Meeting
Once the breakout room feature is enabled, you should start a new meeting and click on the Breakout Room icon in the Zoom’s toolbar. You will be prompted to set the number of rooms you would like to create for the meeting and choose if you want to assign participants to breakout rooms automatically or manually.
Click on the Create Rooms button to complete the process and proceed to fine-tune the settings for each room.
Part 3: How to Manage Breakout Rooms
Zoom offers several options that make managing breakout rooms easier, so after you create breakout rooms for a meeting you should click on the Options icon.
You can then decide if you want to move all participants into breakout rooms automatically, allow participants to return to the main session at any time or set the timeframe after which all breakout rooms are going to close. Optionally, you can also activate a countdown after a breakout room is closed and specify its duration.

Click on the Open all Rooms button to start assigning participants to different breakout rooms. You should then click on the Assign button next to a particular room and select all the participants you wish to add to that room. Keep in mind that the Assign button will be replaced with the number of participants each room has as soon as you add the first participant to them.
Zoom also allows you to move participants from one room to another after you assigned them to one of the breakout rooms you created. You will be able to see Move and Exchange options next to the names of all participants you added to a room. Click on the Move option if you want to move a participant from one room to another or click on the Exchange option if you want to switch places of two participants who were added to different rooms. In addition, you can delete all breakout rooms you created and make new ones by clicking on the Recreate button or delete a room you selected.
Part 4: Recording Zoom Breakout Rooms
The participants who join a breakout room will have several options at their disposal, so that they can mute/unmute other participants, start or stop a video, see the full list of participants, share their screens, chat or record a breakout session.
Participants cannot start recording a breakout room until they are granted permission by the host. Ideally, hosts should enable this option before opening the rooms, although they can grant permission to record by entering a room and enabling the Local Recording option.
Afterward, you just have to click on the Record button and the activities within your breakout room will be recorded. Zoom allows you to pause or stop a recording at any moment and you should just click on the corresponding button in the meeting toolbar to perform this action.
Keep in mind that you may lose the video you’re recording if the recording process is interrupted in any other way other than clicking on the Stop or Pause buttons.
We’ve written an article about Zoom meeting, if you’ve met any questions about it, you can check it here: Record Zoom Meeting Guide .
## Part 5: Troubleshooting Zoom Breakout RoomsEven though creating and managing breakout rooms shouldn’t be too difficult, you may still experience problems. Let’s take a look at some of the most common issues Zoom users encounter with breakout rooms.
1. Why can’t I join a Zoom Breakout Room?
Only users with access to Zoom desktop client, Zoom mobile app and H.323/SIP devices can join breakout rooms. You won’t be able to join a breakout room if you are using Zoom from a web browser.
2. Can I communicate with participants in Breakout Session?
Hosts can only communicate with participants of a single breakout room, which means that they have to join a room to which a particular participant was assigned in order to communicate with them.
3. Can participants switch between breakout rooms after a session starts?
No, this is not an option. However, if you remove a participant from the meeting, you will be able to assign them to a new breakout room after they rejoin the meeting.
4. What happens if I miss or close an invitation to a breakout session?
Participants can join a breakout session before it ends. Join Breakout Session icon will remain active as long as the meeting is in progress.
Conclusion
Dividing a meeting into smaller sessions that have fewer participants can boost the productivity of an entire team. Zoom’s breakout rooms offer an easy way to accomplish this by allowing the host to create up to fifty different rooms that can have as many as 200 participants. Setting up breakout rooms with Zoom is a straightforward process that is not going to take more than a few moments of your time. Do you use Zoom’s breakout rooms feature? Leave a comment below and share your experiences with us.
Richard Bennett
Richard Bennett is a writer and a lover of all things video.
Follow @Richard Bennett
Richard Bennett
Mar 27, 2024• Proven solutions
How to Use Zoom Breakout Rooms
Maximizing the team’s efficiency is the ultimate goal of every team manager, but large meetings can often turn unproductive because members of the team don’t have enough time to communicate. In addition, multiple speakers cannot speak at the same time during a meeting, which is why it is better to create a separate space where different team members can talk without interruption.
Zoom application offers a perfect solution to this problem by enabling participants to join breakout rooms where they can discuss particular tasks in private.
You are at the right place if you are just getting started with Zoom. Because in this tutorial we are going to show you how to use Zoom breakout rooms during meetings you host on this app.
- Part 1: What is a Breakout Room in Zoom?
- Part 2: How to Create a Breakout Room?
- Part 3: How to Manage Breakout Rooms?
- Part 4: How to Record Breakout Rooms meetings?
- Part 5: Troubleshooting Zoom Breakout Rooms
Part 1: What is a Breakout Room in Zoom?
A breakout room is a sub-room that can be created during a meeting and you can split a meeting into up to 50 breakout sessions. The app allows you to choose if you want to create these sub-rooms and split the participants in a meeting into smaller groups automatically or manually.
You must purchase the Large Meeting add-on if you would like to create 50 breakout sessions that have as many as two hundred participants. Each participant in a breakout session has complete control over video, audio and screen sharing options, and they can record each breakroom locally. In case the meeting’s host has enabled the cloud recording feature, Zoom will only record the main room while giving the participants the option to record the breakout room separately.
Part 2: How to Create a Breakout Room?
1. Enable Breakout Rooms in Zoom
Creating a breakout room requires you to install the Zoom desktop client and to create an account on Zoom. Once you complete these two steps, you should sign in to your account and choose the Account Settings option from the Account Management menu. Locate the Breakout Room feature that is located in the Meeting tab and if the feature is disabled you should click on it to toggle it on.
Hosts who would like to assign participants to breakout rooms while scheduling a meeting should click on the Allow host to assign participants to breakout rooms when scheduling a checkbox. Clicking on the Lock icon will make the breakout room setting mandatory for all users on your Zoom account.
Besides using the breakout rooms during meetings, you can also enable them in different groups you create. Head over to the User Management menu, click on the Group Management option and then select the group in which you would like to enable breakout rooms.
Click on the Settings tab, navigate to the Meetings tab and click on the Breakout Room feature. You can then proceed to enable this option the same way you would enable it if you were setting up a regular Zoom meeting.
Zoom also allows account administrators and account members to activate the breakout room feature. You should click on the Settings option if you are accessing a Zoom account as an account member or go to the Account Management and pick the Account Settings option if you are accessing a Zoom account as an account administrator.
Afterward, you should just enable the breakout room option from the Meetings tab and decide if you want to pre-assign members to particular rooms while scheduling a meeting.
2. Create Breakout Rooms in Zoom Meeting
Once the breakout room feature is enabled, you should start a new meeting and click on the Breakout Room icon in the Zoom’s toolbar. You will be prompted to set the number of rooms you would like to create for the meeting and choose if you want to assign participants to breakout rooms automatically or manually.
Click on the Create Rooms button to complete the process and proceed to fine-tune the settings for each room.
Part 3: How to Manage Breakout Rooms
Zoom offers several options that make managing breakout rooms easier, so after you create breakout rooms for a meeting you should click on the Options icon.
You can then decide if you want to move all participants into breakout rooms automatically, allow participants to return to the main session at any time or set the timeframe after which all breakout rooms are going to close. Optionally, you can also activate a countdown after a breakout room is closed and specify its duration.
Click on the Open all Rooms button to start assigning participants to different breakout rooms. You should then click on the Assign button next to a particular room and select all the participants you wish to add to that room. Keep in mind that the Assign button will be replaced with the number of participants each room has as soon as you add the first participant to them.
Zoom also allows you to move participants from one room to another after you assigned them to one of the breakout rooms you created. You will be able to see Move and Exchange options next to the names of all participants you added to a room. Click on the Move option if you want to move a participant from one room to another or click on the Exchange option if you want to switch places of two participants who were added to different rooms. In addition, you can delete all breakout rooms you created and make new ones by clicking on the Recreate button or delete a room you selected.
Part 4: Recording Zoom Breakout Rooms
The participants who join a breakout room will have several options at their disposal, so that they can mute/unmute other participants, start or stop a video, see the full list of participants, share their screens, chat or record a breakout session.
Participants cannot start recording a breakout room until they are granted permission by the host. Ideally, hosts should enable this option before opening the rooms, although they can grant permission to record by entering a room and enabling the Local Recording option.
Afterward, you just have to click on the Record button and the activities within your breakout room will be recorded. Zoom allows you to pause or stop a recording at any moment and you should just click on the corresponding button in the meeting toolbar to perform this action.
Keep in mind that you may lose the video you’re recording if the recording process is interrupted in any other way other than clicking on the Stop or Pause buttons.
We’ve written an article about Zoom meeting, if you’ve met any questions about it, you can check it here: Record Zoom Meeting Guide .
Part 5: Troubleshooting Zoom Breakout Rooms
Even though creating and managing breakout rooms shouldn’t be too difficult, you may still experience problems. Let’s take a look at some of the most common issues Zoom users encounter with breakout rooms.
1. Why can’t I join a Zoom Breakout Room?
Only users with access to Zoom desktop client, Zoom mobile app and H.323/SIP devices can join breakout rooms. You won’t be able to join a breakout room if you are using Zoom from a web browser.
2. Can I communicate with participants in Breakout Session?
Hosts can only communicate with participants of a single breakout room, which means that they have to join a room to which a particular participant was assigned in order to communicate with them.

3. Can participants switch between breakout rooms after a session starts?
No, this is not an option. However, if you remove a participant from the meeting, you will be able to assign them to a new breakout room after they rejoin the meeting.
4. What happens if I miss or close an invitation to a breakout session?
Participants can join a breakout session before it ends. Join Breakout Session icon will remain active as long as the meeting is in progress.
Conclusion
Dividing a meeting into smaller sessions that have fewer participants can boost the productivity of an entire team. Zoom’s breakout rooms offer an easy way to accomplish this by allowing the host to create up to fifty different rooms that can have as many as 200 participants. Setting up breakout rooms with Zoom is a straightforward process that is not going to take more than a few moments of your time. Do you use Zoom’s breakout rooms feature? Leave a comment below and share your experiences with us.
Richard Bennett
Richard Bennett is a writer and a lover of all things video.
Follow @Richard Bennett
- Title: [Updated] 2024 Approved Diving Into Zoom Breakout Room Setups
- Author: Amelia
- Created at : 2024-07-18 19:17:36
- Updated at : 2024-07-19 19:17:36
- Link: https://screen-capture.techidaily.com/updated-2024-approved-diving-into-zoom-breakout-room-setups/
- License: This work is licensed under CC BY-NC-SA 4.0.