![[New] In 2024, Secrets Unveiled The Ultimate Strategies for Saving Disco Livestreams](https://thmb.techidaily.com/e4dab8212b61415ab670db2724890039dc218886423e579644f1092e23638fe5.jpg)
"[New] In 2024, Secrets Unveiled The Ultimate Strategies for Saving Disco Livestreams"
Secrets Unveiled: The Ultimate Strategies for Saving Disco Livestreams
Discord will be one of the particular most popular VoIP communication tools presently available. Highly well-known among gamers, this particular tool allows customers to communicate straight via voice, movie, or text plus join servers or even chat rooms exactly where larger communities may interact together. Apart from as being the great place with regard to gamers to talk during online games, it is also a spot to meet new like-minded individuals and trade opinions. Discord offers all of the particular essential features in order to get interesting discussions, but there will be no option in order to record those discussions.
Discord is a great platform that provides individuals of numerous communities together, providing endless communication equipment. The downside will be, the majority of the actions happens in current. Discord can operate in your internet browser instead of on the separate app. This allows adjusting the particular sound settings associated with every person on your own stream individually. Additionally, with Discord, a person is able in order to create a worldwide server with various channels and deal with the permission ranges for all customers or groups individually. You can’t report and save Discord audio tracks for upcoming use. This is definitely where you desire a piece of software program to screen record discord stream. We created this particular guide to assist you save audio tracks from Discord avenues. Below, you’ll discover instructions for documenting Discord audio tracks making use of Filmora, OBS plus Audacity on various devices.
Way 1. Use Filmora
In situation you are the gamer who utilizes Discord for interacting with your buddies while gaming, a person should not skip Filmora. It is definitely all-in-one video capturing software that may record your display screen with audio, facecam, and green display screen effect, record complete screen or component of the display screen and make several simple edits in order to your footage making use of trimming, cropping, increase/reduce audio tracks level, plus so forth
Filmora is an amazing video recorder that will permits users in order to record on-screen routines, including Discord audio tracks and video phone calls. As it is definitely known, Discord is definitely a group-chatting app that hosts on the web communications. With that will said, Filmora is definitely a good Discord bot that may capture Discord sound, video calls, plus even gameplay. This particular video recorder can not only record movies, gameplay, and report webcam, but this can also end up being well suited for creating video clip lessons. Aside through Discord, additionally, it may catch online streaming audios.
For Win 7 or later (64-bit)
For macOS 10.12 or later
Step 1: Download and Install Filmora
In the first step, all you need to do is download and install this software to your MacBook so you can use it on various occasions and for various purposes like screen recording to recordings editing. To do that, follow the link below to download this software for Discord recording.
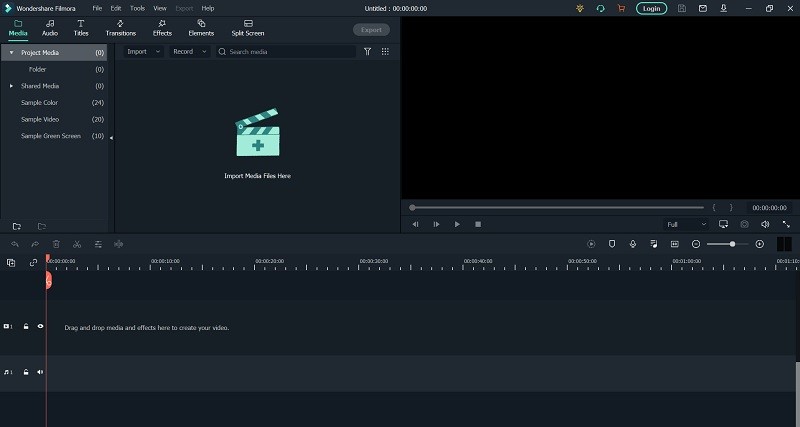
As soon as the download finishes hit the launch application to execute the installation process so you can follow the default steps to get this software in your PC applications in a ready-to-use form.
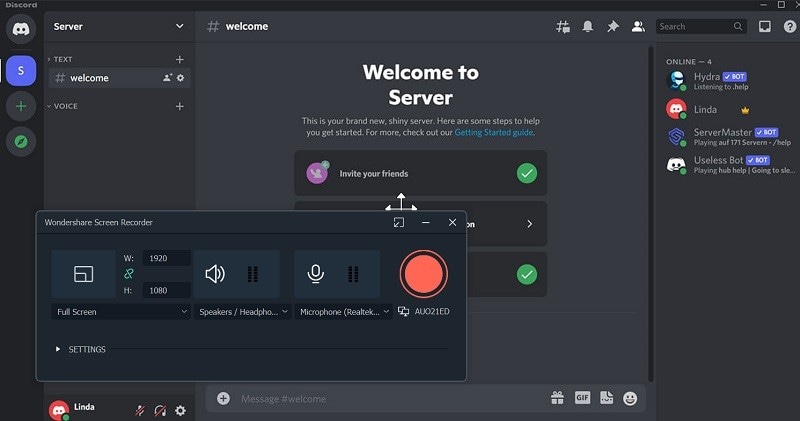
Step 2: Launch Discord Recording
In this step, you shall have installed Wondershare Filmora, and now is the time to launch it from your MacBook. As soon as you launch it, you shall see a window interface appearing for two options of recording screen to editing your previous videos or creating videos with this software. Click on the Recording option from the menu. As soon as you hit the recording button, the software will lead you into the recording interface which is the intuitive platform to customize the audio and webcam settings according to your requirements. To include the microphone or Discord sound, you can hit the required buttons to that specified field as shown below:
Step 3: Start /Stop Recording
Now as all the settings are done and dusted, it’s time to hit the recording button and be with it. To proceed with the recordings, hit the red circled button which after giving you a specific 3-5 seconds, eventually start recordings the customized screen of your PC efficiently as shown below:

Step 4: Export Discord Recording
The best part with the Wondershare Filmora is that you can export as well as share your output video file directly to YouTube as well with the only requirement as the Sign in to your YouTube channel within the software as follow:
Way 2. Use OBS
OBS (Open Broadcaster Software) may be the open-source tool that allows you capture Discord sound from your own desktop on windows, Mac and Linux. With OBS, a person can broadcast your own Discord sound plus share the video gaming conversation. Follow the particular procedure for report Discord calls along with OBS. OBS provides considerably more sound settings than Discord. Therefore, some streamers decide to record sound using OBS plus output it in order to Discord. You are usually able to report an unlimited quantity of sessions for totally free. They have an additional benefit of a built/in video editor because well, which will certainly be available within useful in situation in case a person is trying in order to create a movie podcast.
OBS utilizes open-source movie encoding library x264 to encode movie, which would become very CPU rigorous. Nevertheless, you may take off lots CPU utilization making use of hardware encoders run by Quick sync, AMF, or NVENC. If you need to record Discord sound on your pc at no price, it would be easiest able in order to take OBS in to consideration. OBS will be really a totally free and open-source documenting and streaming software that works upon Windows, macOS plus Linux. Whether you would like to record sound or even video from Discord, it’s best in order to do this using OBS. Open Broadcast Software program is free, open-source, and it will be among the world’s most widely utilized items of video recording/streaming software.
This is definitely a quick yet comprehensive guide how to record Discord audio tracks or video clip using OBS. The particular actual steps beneath to records Discord audio tracks using OBS:
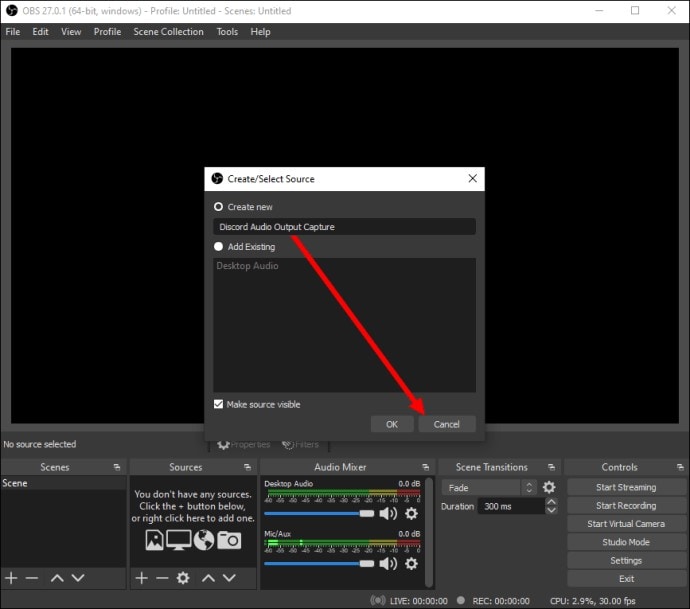
**Step 1: Visit OBS’s standard website and down load the kind associated with version for your own OS. Install OBS on your computer and sign upward. In OBS, click on the in-addition icon (+) situated at the underside of your display screen, in the Resources section.

![]()
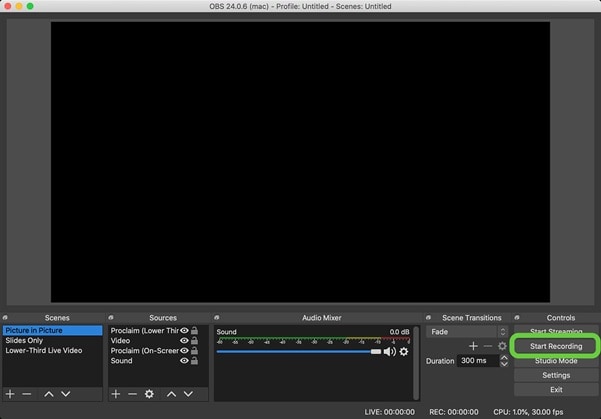
**Step 2: From the particular dropdown menu, choose Audio Output Catch. Name your audio tracks source and click on Ok, guarantee the particular Make source obvious option is examined. Expand the dropdown menu next in order to Device and choose your audio tracks result device, for illustration, headphones or audio speakers. Click Ok. Click on on the Begin Recording button found in the Controls area at the bottom-right corner of your own screen.
**Step 3: By arrears, audio tracks is documented as a empty video in. MKV format. To choose an alternative format, click on Output, then choose an alternative option from the menus close to Recording Structure. To permit or even disable your mic recording, click upon the loudspeaker image found in the Sound Mixer section.
**Step 4: Close to the loudspeaker image, you should discover a blue slider. Shift it in order to regulate recording quantity. To find your own recordings, click Document, then Show Songs.

Way 3. Use Audacity
Audacity is a free of charge and open supply audio tracks recorder plus editor for windows, macOS X, Linux/GNU and other working systems. With Audacity, you can report discord audio, reside audio tracks and audio tracks playback. What’s a lot more, you can report and convert cassette tapes to MP3 FORMAT or CD. Discover how to report discord audio tracks along with Audacity. You are usually able to report Discord audio tracks along with Audacity. Nevertheless, in the event that you’re planning in order to record a tone of voice chat and desire to hear your own personal voice on the particular recording as properly as other individuals, you’re out associated with luck. Audacity just has a one audio tracks input, therefore that you may either hear specifications of your very own voice or various other people’s although not each. You can make use of OBS or Filmora for this.
You may use Audacity in order to record from your own microphone which can pick up audio tracks from Discord out of your speakers. It’s the convoluted setup yet gets the work done. Now, Along with Discord, this will certainly also be the particular main gaming talk platform that is usually available on the particular internet and furthermore the Audacity. This particular can also become among the best free sound editing programs close to. Now, this may also make a few senses to notice if both associated with these works with each other. Therefore, you may also record Discord sound with Audacity. Although, if a person is also preparing to record the voice chat and after that also want in order to hear this within your own tone of voice on the documenting.
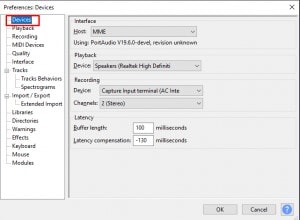
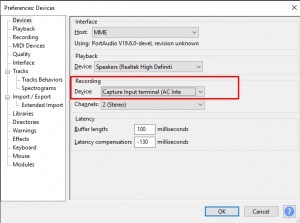
**Step 1: Download and set up Audacity. Select Modify and Preferences inside Audacity once packed. Select Devices through the popup windowpane.
**Step 2: Select the Documenting device as your own microphone. Have the particular voice chat arrive through your loudspeakers loud enough in order to record.

**Step 3: Set Audacity to record making use of your mic. You are not able to occurs mic in order to talk otherwise a person will talk on the recording.
**Step 4: You will certainly also have to ensure the mic is usually far enough aside from your loudspeakers to not conflict with the sound but still obtain it. It’s a good inelegant solution yet it could work. Lastly, done with the recording by referring to the Record button as shown here:

Conclusion
As a tone of voice and text talk app, Discord assists gamers talk in order to one another in current with high quality and low latency. Sometimes you may want to report the sound plus video calls upon it, and discover that there’s simply no official way in order to do that. As a result, how to report Discord calls? Really, it’s very easy by using some dependable third-party tools. Discord is an outstanding chat and conversation application that created for game players. This really is regularly utilized by gamers regarding its high effectiveness in communication. Discord is really the lightweight program that will won’t take upward much hardware-driven area on computer.
For macOS 10.12 or later
Step 1: Download and Install Filmora
In the first step, all you need to do is download and install this software to your MacBook so you can use it on various occasions and for various purposes like screen recording to recordings editing. To do that, follow the link below to download this software for Discord recording.

As soon as the download finishes hit the launch application to execute the installation process so you can follow the default steps to get this software in your PC applications in a ready-to-use form.
Step 2: Launch Discord Recording
In this step, you shall have installed Wondershare Filmora, and now is the time to launch it from your MacBook. As soon as you launch it, you shall see a window interface appearing for two options of recording screen to editing your previous videos or creating videos with this software. Click on the Recording option from the menu. As soon as you hit the recording button, the software will lead you into the recording interface which is the intuitive platform to customize the audio and webcam settings according to your requirements. To include the microphone or Discord sound, you can hit the required buttons to that specified field as shown below:
Step 3: Start /Stop Recording
Now as all the settings are done and dusted, it’s time to hit the recording button and be with it. To proceed with the recordings, hit the red circled button which after giving you a specific 3-5 seconds, eventually start recordings the customized screen of your PC efficiently as shown below:
Step 4: Export Discord Recording
The best part with the Wondershare Filmora is that you can export as well as share your output video file directly to YouTube as well with the only requirement as the Sign in to your YouTube channel within the software as follow:
Way 2. Use OBS
OBS (Open Broadcaster Software) may be the open-source tool that allows you capture Discord sound from your own desktop on windows, Mac and Linux. With OBS, a person can broadcast your own Discord sound plus share the video gaming conversation. Follow the particular procedure for report Discord calls along with OBS. OBS provides considerably more sound settings than Discord. Therefore, some streamers decide to record sound using OBS plus output it in order to Discord. You are usually able to report an unlimited quantity of sessions for totally free. They have an additional benefit of a built/in video editor because well, which will certainly be available within useful in situation in case a person is trying in order to create a movie podcast.
OBS utilizes open-source movie encoding library x264 to encode movie, which would become very CPU rigorous. Nevertheless, you may take off lots CPU utilization making use of hardware encoders run by Quick sync, AMF, or NVENC. If you need to record Discord sound on your pc at no price, it would be easiest able in order to take OBS in to consideration. OBS will be really a totally free and open-source documenting and streaming software that works upon Windows, macOS plus Linux. Whether you would like to record sound or even video from Discord, it’s best in order to do this using OBS. Open Broadcast Software program is free, open-source, and it will be among the world’s most widely utilized items of video recording/streaming software.
This is definitely a quick yet comprehensive guide how to record Discord audio tracks or video clip using OBS. The particular actual steps beneath to records Discord audio tracks using OBS:
**Step 1: Visit OBS’s standard website and down load the kind associated with version for your own OS. Install OBS on your computer and sign upward. In OBS, click on the in-addition icon (+) situated at the underside of your display screen, in the Resources section.
![]()
**Step 2: From the particular dropdown menu, choose Audio Output Catch. Name your audio tracks source and click on Ok, guarantee the particular Make source obvious option is examined. Expand the dropdown menu next in order to Device and choose your audio tracks result device, for illustration, headphones or audio speakers. Click Ok. Click on on the Begin Recording button found in the Controls area at the bottom-right corner of your own screen.
**Step 3: By arrears, audio tracks is documented as a empty video in. MKV format. To choose an alternative format, click on Output, then choose an alternative option from the menus close to Recording Structure. To permit or even disable your mic recording, click upon the loudspeaker image found in the Sound Mixer section.
**Step 4: Close to the loudspeaker image, you should discover a blue slider. Shift it in order to regulate recording quantity. To find your own recordings, click Document, then Show Songs.
Way 3. Use Audacity
Audacity is a free of charge and open supply audio tracks recorder plus editor for windows, macOS X, Linux/GNU and other working systems. With Audacity, you can report discord audio, reside audio tracks and audio tracks playback. What’s a lot more, you can report and convert cassette tapes to MP3 FORMAT or CD. Discover how to report discord audio tracks along with Audacity. You are usually able to report Discord audio tracks along with Audacity. Nevertheless, in the event that you’re planning in order to record a tone of voice chat and desire to hear your own personal voice on the particular recording as properly as other individuals, you’re out associated with luck. Audacity just has a one audio tracks input, therefore that you may either hear specifications of your very own voice or various other people’s although not each. You can make use of OBS or Filmora for this.
You may use Audacity in order to record from your own microphone which can pick up audio tracks from Discord out of your speakers. It’s the convoluted setup yet gets the work done. Now, Along with Discord, this will certainly also be the particular main gaming talk platform that is usually available on the particular internet and furthermore the Audacity. This particular can also become among the best free sound editing programs close to. Now, this may also make a few senses to notice if both associated with these works with each other. Therefore, you may also record Discord sound with Audacity. Although, if a person is also preparing to record the voice chat and after that also want in order to hear this within your own tone of voice on the documenting.
**Step 1: Download and set up Audacity. Select Modify and Preferences inside Audacity once packed. Select Devices through the popup windowpane.
**Step 2: Select the Documenting device as your own microphone. Have the particular voice chat arrive through your loudspeakers loud enough in order to record.
**Step 3: Set Audacity to record making use of your mic. You are not able to occurs mic in order to talk otherwise a person will talk on the recording.
**Step 4: You will certainly also have to ensure the mic is usually far enough aside from your loudspeakers to not conflict with the sound but still obtain it. It’s a good inelegant solution yet it could work. Lastly, done with the recording by referring to the Record button as shown here:
Conclusion
As a tone of voice and text talk app, Discord assists gamers talk in order to one another in current with high quality and low latency. Sometimes you may want to report the sound plus video calls upon it, and discover that there’s simply no official way in order to do that. As a result, how to report Discord calls? Really, it’s very easy by using some dependable third-party tools. Discord is an outstanding chat and conversation application that created for game players. This really is regularly utilized by gamers regarding its high effectiveness in communication. Discord is really the lightweight program that will won’t take upward much hardware-driven area on computer.
For macOS 10.12 or later
Step 1: Download and Install Filmora
In the first step, all you need to do is download and install this software to your MacBook so you can use it on various occasions and for various purposes like screen recording to recordings editing. To do that, follow the link below to download this software for Discord recording.
As soon as the download finishes hit the launch application to execute the installation process so you can follow the default steps to get this software in your PC applications in a ready-to-use form.
Step 2: Launch Discord Recording
In this step, you shall have installed Wondershare Filmora, and now is the time to launch it from your MacBook. As soon as you launch it, you shall see a window interface appearing for two options of recording screen to editing your previous videos or creating videos with this software. Click on the Recording option from the menu. As soon as you hit the recording button, the software will lead you into the recording interface which is the intuitive platform to customize the audio and webcam settings according to your requirements. To include the microphone or Discord sound, you can hit the required buttons to that specified field as shown below:
Step 3: Start /Stop Recording
Now as all the settings are done and dusted, it’s time to hit the recording button and be with it. To proceed with the recordings, hit the red circled button which after giving you a specific 3-5 seconds, eventually start recordings the customized screen of your PC efficiently as shown below:
Step 4: Export Discord Recording
The best part with the Wondershare Filmora is that you can export as well as share your output video file directly to YouTube as well with the only requirement as the Sign in to your YouTube channel within the software as follow:
Way 2. Use OBS
OBS (Open Broadcaster Software) may be the open-source tool that allows you capture Discord sound from your own desktop on windows, Mac and Linux. With OBS, a person can broadcast your own Discord sound plus share the video gaming conversation. Follow the particular procedure for report Discord calls along with OBS. OBS provides considerably more sound settings than Discord. Therefore, some streamers decide to record sound using OBS plus output it in order to Discord. You are usually able to report an unlimited quantity of sessions for totally free. They have an additional benefit of a built/in video editor because well, which will certainly be available within useful in situation in case a person is trying in order to create a movie podcast.
OBS utilizes open-source movie encoding library x264 to encode movie, which would become very CPU rigorous. Nevertheless, you may take off lots CPU utilization making use of hardware encoders run by Quick sync, AMF, or NVENC. If you need to record Discord sound on your pc at no price, it would be easiest able in order to take OBS in to consideration. OBS will be really a totally free and open-source documenting and streaming software that works upon Windows, macOS plus Linux. Whether you would like to record sound or even video from Discord, it’s best in order to do this using OBS. Open Broadcast Software program is free, open-source, and it will be among the world’s most widely utilized items of video recording/streaming software.
This is definitely a quick yet comprehensive guide how to record Discord audio tracks or video clip using OBS. The particular actual steps beneath to records Discord audio tracks using OBS:
**Step 1: Visit OBS’s standard website and down load the kind associated with version for your own OS. Install OBS on your computer and sign upward. In OBS, click on the in-addition icon (+) situated at the underside of your display screen, in the Resources section.
![]()
**Step 2: From the particular dropdown menu, choose Audio Output Catch. Name your audio tracks source and click on Ok, guarantee the particular Make source obvious option is examined. Expand the dropdown menu next in order to Device and choose your audio tracks result device, for illustration, headphones or audio speakers. Click Ok. Click on on the Begin Recording button found in the Controls area at the bottom-right corner of your own screen.
**Step 3: By arrears, audio tracks is documented as a empty video in. MKV format. To choose an alternative format, click on Output, then choose an alternative option from the menus close to Recording Structure. To permit or even disable your mic recording, click upon the loudspeaker image found in the Sound Mixer section.
**Step 4: Close to the loudspeaker image, you should discover a blue slider. Shift it in order to regulate recording quantity. To find your own recordings, click Document, then Show Songs.
Way 3. Use Audacity
Audacity is a free of charge and open supply audio tracks recorder plus editor for windows, macOS X, Linux/GNU and other working systems. With Audacity, you can report discord audio, reside audio tracks and audio tracks playback. What’s a lot more, you can report and convert cassette tapes to MP3 FORMAT or CD. Discover how to report discord audio tracks along with Audacity. You are usually able to report Discord audio tracks along with Audacity. Nevertheless, in the event that you’re planning in order to record a tone of voice chat and desire to hear your own personal voice on the particular recording as properly as other individuals, you’re out associated with luck. Audacity just has a one audio tracks input, therefore that you may either hear specifications of your very own voice or various other people’s although not each. You can make use of OBS or Filmora for this.
You may use Audacity in order to record from your own microphone which can pick up audio tracks from Discord out of your speakers. It’s the convoluted setup yet gets the work done. Now, Along with Discord, this will certainly also be the particular main gaming talk platform that is usually available on the particular internet and furthermore the Audacity. This particular can also become among the best free sound editing programs close to. Now, this may also make a few senses to notice if both associated with these works with each other. Therefore, you may also record Discord sound with Audacity. Although, if a person is also preparing to record the voice chat and after that also want in order to hear this within your own tone of voice on the documenting.
**Step 1: Download and set up Audacity. Select Modify and Preferences inside Audacity once packed. Select Devices through the popup windowpane.
**Step 2: Select the Documenting device as your own microphone. Have the particular voice chat arrive through your loudspeakers loud enough in order to record.
**Step 3: Set Audacity to record making use of your mic. You are not able to occurs mic in order to talk otherwise a person will talk on the recording.
**Step 4: You will certainly also have to ensure the mic is usually far enough aside from your loudspeakers to not conflict with the sound but still obtain it. It’s a good inelegant solution yet it could work. Lastly, done with the recording by referring to the Record button as shown here:
Conclusion
As a tone of voice and text talk app, Discord assists gamers talk in order to one another in current with high quality and low latency. Sometimes you may want to report the sound plus video calls upon it, and discover that there’s simply no official way in order to do that. As a result, how to report Discord calls? Really, it’s very easy by using some dependable third-party tools. Discord is an outstanding chat and conversation application that created for game players. This really is regularly utilized by gamers regarding its high effectiveness in communication. Discord is really the lightweight program that will won’t take upward much hardware-driven area on computer.
- Title: [New] In 2024, Secrets Unveiled The Ultimate Strategies for Saving Disco Livestreams
- Author: Amelia
- Created at : 2024-07-18 19:24:32
- Updated at : 2024-07-19 19:24:32
- Link: https://screen-capture.techidaily.com/new-in-2024-secrets-unveiled-the-ultimate-strategies-for-saving-disco-livestreams/
- License: This work is licensed under CC BY-NC-SA 4.0.