
!["[New] In 2024, Mastering Desktop & Mobile Capturing Team Video Conferences"](https://www.lifewire.com/thmb/eS1YD0LsEQhVuAP3cxZA8t-_eDU=/400x300/filters:no_upscale():max_bytes(150000):strip_icc():format(webp)/iPad-Pro_creative-sketch_10302018-5be0773ac9e77c0051d5d51c.jpg)
"[New] In 2024, Mastering Desktop & Mobile Capturing Team Video Conferences"
Mastering Desktop & Mobile: Capturing Team Video Conferences
How to Record Teams Video Meeting?

Richard Bennett
Mar 27, 2024• Proven solutions
If you are hosting a Microsoft Teams meeting or are an important attendee, you may want to record the entire video session for official records. Therefore, the following sections explain how to record Teams meeting on a desktop/laptop computer and a mobile device with ease. In addition, here you will also get to know how to record a Teams meeting automatically, locate the recorded files, and share them conveniently.
Now, because Microsoft Teams notifies all the attendees when you start recording a meeting, one of the sections will also teach how to record Teams meeting secretly, i.e., without letting anyone know that you’re capturing the footage behind the scenes, just in case you want so.
- Part 1: Record Microsoft Teams Meetings on Desktop and Mobile
- Part 2: Automatically Record Microsoft Teams Meetings
- Part 3: Find Recorded Meetings in Teams
- Part 4: Share Recorded Teams Meetings
- Part 5: Record Teams Meeting Secretly
Part 1: How to Record Microsoft Teams Meetings on Desktop and Mobile?
The methods that are given below explain how to record Teams meeting on a PC, an iOS device (typically an iPhone), and Android.
Prerequisites to Record Teams Video Meeting
In order to record a Teams meeting, you:
- Must be a meeting organizer
- Must be using Office 365 Enterprise with an E1, E3, E5, F3, A1, A3, A5, M365 Business, Business Essentials, or Business Premium license
- Must have the recording feature turned on by the IT administrator of the organization
- Must not be a guest or attendee from another organization
1. Record Teams Meeting on Desktop/Laptop
Once you are sure that all the prerequisites that are listed above are met, you can go through the following instructions to learn how to record a Teams meeting on a computer:
Step 1: Start a Teams Video Call
Launch Microsoft Teams on your PC (a Windows 10 laptop here). On the main interface, make sure that the Chat option is selected in the pane on the left. Then, click Video Call (the Camcorder icon) from the top-right area of the Chat pane.
Step 2: Start the Recording
During an ongoing meeting session, click the More actions icon from the top-right area of the Meeting with box, and click Start recording from the menu that comes down next to start the recording.

Step 3: Stop the Recording
Once the meeting session is over, you can open the More actions menu again, and click Stop recording this time to stop the recording.
2. Record Teams Video Meeting on Smartphones
There are a couple of things that you must ensure before a Teams meeting can be recorded on smartphones. The list is given below:
- The correct licenses for Office 365 Enterprise as listed earlier
- The IT administrator has NOT disabled the recording feature
- The Teams data is NOT set to be stored in-country
- You are using the latest version of Teams
- The recording is NOT set in any private team channel
Once all the requirements listed above are met, you can safely continue with the following methods to learn how to record a Teams meeting on a smartphone.
2.1 Record Teams Meeting on iPhone
You can learn how to record Teams meeting on an iPhone with the help of the following instructions:
Step 1: Start a New Meeting on iPhone
Launch Microsoft Teams on your iPhone. Make sure that Chat is selected from the options available at the bottom, tap Instant meeting (the Camcorder icon) from the top-right area of the screen, and tap Start meeting from the Instant meeting box that pops at the lower section to start a new Microsoft Teams meeting.
Step 2: Start the Recording
During the meeting session, tap More actions from the bottom, and tap Start recording to start the recording.
Step 3: Stop the Recording
After the meeting session, tap More actions again, and tap Stop recording this time to stop the recording.
Step 4: Record Meeting on iPhone Externally
Before starting the meeting session, swipe the screen from top-right to bottom (in iPhone X and later) to get to the Control Center screen, and tap the Record button to start the recording secretly. Next, start a new meeting normally. To stop the recording, get to Control Panel again, and tap Stop Recording.
2.2 Record Teams Meeting on Android
The steps that are given below teach how to record a Teams meeting on an Android smartphone:
Step 1: Start a New Meeting
Launch Microsoft Teams on your Android smartphone, make sure that the Chat option is selected from the bottom, tap the Instant meeting icon from the top-right area of the screen, and tap Start meeting from the Instant meeting box. On the next screen, tap Join now to start or join a meeting.
Step 2: Start the Recording
While in the meeting session, tap the More actions icon from the bottom, and tap Start recording from the menu that comes up.
Step 3: Stop the Recording
After the meeting session, tap the More actions icon again, and tap Stop recording from the menu to stop recording the meeting.
Part 2: How to Automatically Record Microsoft Teams Meetings?
Quite recently, Microsoft integrated a new feature to the Teams app that allows the organizers to automatically record all the meeting sessions that take place. The recording starts automatically as soon as the first participant joins a meeting. This automatic recording function can be easily turned off if the organizer wants to.
You can learn how to record a Teams meeting automatically by following the instructions that are given below:
Step 1: Get to the Meeting with Box
Launch Microsoft Teams on your computer, and use the method explained earlier to get to the Meeting with box by initiating a new meeting.
Step 2: Get to the Meeting options Page
When on the Meeting with box, click Join now to start a new meeting, click the Show participants icon from the upper-right area, and when the Participants box comes up, click Manage permissions.
Step 3: Enable Automatic Recording
On the Meeting options page, turn on the Record automatically switch. Once this is done, you can safely share the invitation link with the people you want to attend the meeting, and Teams will start the recording as soon as the first participant joins in.
Part 3: How to Find Recorded Meetings in Teams?
The recorded files of the Teams meetings are saved to SharePoint in case of a channel meeting, or to the ‘Recordings’ folder on OneDrive if it was any other type of meeting. The processes of locating the Teams meeting files are given below:
For Channel Meetings
- Launch Microsoft Teams
- Click to select the Files option from the left pane
- Click to select Microsoft Teams from the Files pane
- Locate the recorded meeting from the window on the right
For Other Meeting Types
- Get to the Files pane using the method explained in the previous section
- Click to select OneDrive from the Cloud storage section
- Locate the recorded meeting file from the right window
Part 4: How to Share Recorded Teams Meetings?
Sharing the recorded meetings is as easy as sharing any other file. The process to share the recording of a meeting file saved on OneDrive is given below:
- Click to select OneDrive from the Cloud storage section of the Files pane as explained earlier
- Locate and right-click the meeting file that you want to share
- Click Share from the context menu
- Use the Share box that opens next to add the participants you want to access the recorded file
- Click Send to start sharing
Part 5: How to Record Teams Meeting Secretly?
Although Microsoft made Teams quite transparent by sending notifications to all the attendees as soon as you start recording a meeting, sometimes you may not want this to happen. In such a case, you must rely on a third-party app that can record your computer screen behind the scenes.
One such program is Filmora by Wondershare. Although Wondershare Filmora is primarily used for industry-standard post-product tasks such as video editing, apply effects and filters to the motion clips, etc., it offers the option to record computer screen , webcam, and audio as additional features so you don’t have to depend on any other software for screencasting.
 Download Mac Version ](https://tools.techidaily.com/wondershare/filmora/download/ )
With that said, the steps that are given below teach how to record Teams meeting secretly with Wondershare Filmora:
Step 1: Get to the Wondershare Screen Recorder Panel
Launch Wondershare Filmora on your PC (a Windows 10 computer is used here for illustration), click the Record menu from the top of the Media window, and click Record PC Screen from the menu that comes down.

Step 2: Configure Recording Preferences
On the Wondershare Screen Recorder panel, expand the advanced options by clicking Settings from the lower section. Next, use the available menus and boxes to set up the recording preferences such as full screen, audio, save location, framerate, recording quality, etc.
Step 3: Start Recording Teams Meeting Secretly
After the recording preferences are set, click the Record button to start the screen recording. After this, use the method explained earlier to join or start a new Microsoft Teams meeting.

Step 4: Stop the Recording and Export
Once the meeting session is over, press F9, or right-click the Screen Recorder icon from the notification area, click Open recorder, and then click the Stop button from the panel that appears next to stop the recording.
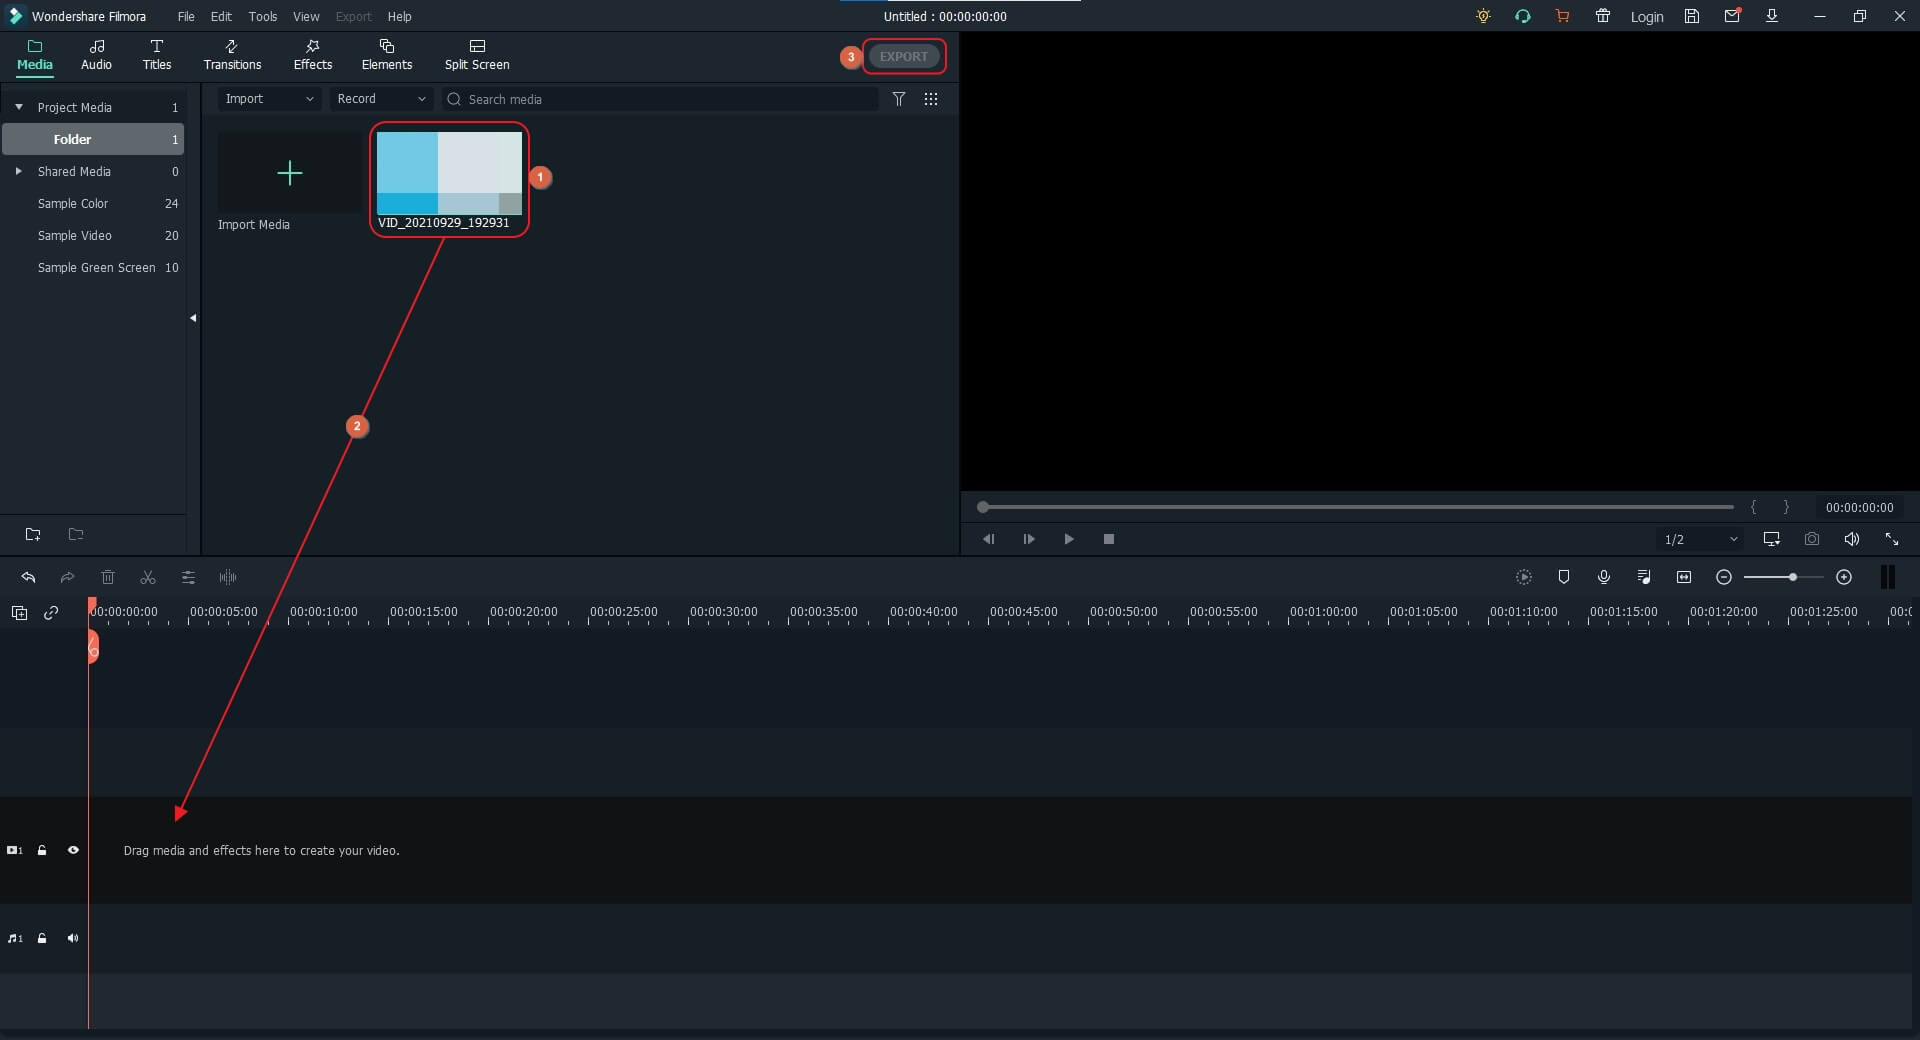
Now, you can drag the recorded footage from the Media box to the Filmora timeline at the bottom to start editing the clip, and then can click EXPORT from the top of the interface to save the final version of the video that can be shared on your preferred platform or with your colleagues, team members, managers, etc.
Find out more solutions to record Teams video meeting .
FAQs About Microsoft Teams Meeting Recording
Q1) Can I record a meeting in Microsoft Teams on mobile?
A1) Yes. As long as you are using the correct license that comes along with the recording feature, you can record Microsoft Teams meetings on both Android and iOS devices. The licenses that allow recording are Office 365 Enterprise E1, E3, E5, F3, A1, A3, A5, M365 Business, Business Essentials, or Business Premium.
Q2) Who can start or stop a recording of a Teams meeting?
A2) The organizer of the meeting or a person from the same organization can start or stop the recording.
Q3) Will people know if I start a recording on Teams meeting?
A3) Yes. If you are using the Teams’ built-in recording feature to record a meeting, all the attendees will be notified about it. If you don’t want anyone to know that you are recording a session, you can use an efficient third-party app like Wondershare Filmora, and follow the steps explained earlier to learn how to record Teams meeting behind the scenes.
Richard Bennett
Richard Bennett is a writer and a lover of all things video.
Follow @Richard Bennett
Richard Bennett
Mar 27, 2024• Proven solutions
If you are hosting a Microsoft Teams meeting or are an important attendee, you may want to record the entire video session for official records. Therefore, the following sections explain how to record Teams meeting on a desktop/laptop computer and a mobile device with ease. In addition, here you will also get to know how to record a Teams meeting automatically, locate the recorded files, and share them conveniently.
Now, because Microsoft Teams notifies all the attendees when you start recording a meeting, one of the sections will also teach how to record Teams meeting secretly, i.e., without letting anyone know that you’re capturing the footage behind the scenes, just in case you want so.
- Part 1: Record Microsoft Teams Meetings on Desktop and Mobile
- Part 2: Automatically Record Microsoft Teams Meetings
- Part 3: Find Recorded Meetings in Teams
- Part 4: Share Recorded Teams Meetings
- Part 5: Record Teams Meeting Secretly
Part 1: How to Record Microsoft Teams Meetings on Desktop and Mobile?
The methods that are given below explain how to record Teams meeting on a PC, an iOS device (typically an iPhone), and Android.
Prerequisites to Record Teams Video Meeting
In order to record a Teams meeting, you:
- Must be a meeting organizer
- Must be using Office 365 Enterprise with an E1, E3, E5, F3, A1, A3, A5, M365 Business, Business Essentials, or Business Premium license
- Must have the recording feature turned on by the IT administrator of the organization
- Must not be a guest or attendee from another organization
1. Record Teams Meeting on Desktop/Laptop
Once you are sure that all the prerequisites that are listed above are met, you can go through the following instructions to learn how to record a Teams meeting on a computer:
Step 1: Start a Teams Video Call
Launch Microsoft Teams on your PC (a Windows 10 laptop here). On the main interface, make sure that the Chat option is selected in the pane on the left. Then, click Video Call (the Camcorder icon) from the top-right area of the Chat pane.
Step 2: Start the Recording
During an ongoing meeting session, click the More actions icon from the top-right area of the Meeting with box, and click Start recording from the menu that comes down next to start the recording.
Step 3: Stop the Recording
Once the meeting session is over, you can open the More actions menu again, and click Stop recording this time to stop the recording.
2. Record Teams Video Meeting on Smartphones
There are a couple of things that you must ensure before a Teams meeting can be recorded on smartphones. The list is given below:
- The correct licenses for Office 365 Enterprise as listed earlier
- The IT administrator has NOT disabled the recording feature
- The Teams data is NOT set to be stored in-country
- You are using the latest version of Teams
- The recording is NOT set in any private team channel
Once all the requirements listed above are met, you can safely continue with the following methods to learn how to record a Teams meeting on a smartphone.
2.1 Record Teams Meeting on iPhone
You can learn how to record Teams meeting on an iPhone with the help of the following instructions:
Step 1: Start a New Meeting on iPhone
Launch Microsoft Teams on your iPhone. Make sure that Chat is selected from the options available at the bottom, tap Instant meeting (the Camcorder icon) from the top-right area of the screen, and tap Start meeting from the Instant meeting box that pops at the lower section to start a new Microsoft Teams meeting.
Step 2: Start the Recording
During the meeting session, tap More actions from the bottom, and tap Start recording to start the recording.
Step 3: Stop the Recording
After the meeting session, tap More actions again, and tap Stop recording this time to stop the recording.
Step 4: Record Meeting on iPhone Externally
Before starting the meeting session, swipe the screen from top-right to bottom (in iPhone X and later) to get to the Control Center screen, and tap the Record button to start the recording secretly. Next, start a new meeting normally. To stop the recording, get to Control Panel again, and tap Stop Recording.
2.2 Record Teams Meeting on Android
The steps that are given below teach how to record a Teams meeting on an Android smartphone:
Step 1: Start a New Meeting
Launch Microsoft Teams on your Android smartphone, make sure that the Chat option is selected from the bottom, tap the Instant meeting icon from the top-right area of the screen, and tap Start meeting from the Instant meeting box. On the next screen, tap Join now to start or join a meeting.
Step 2: Start the Recording
While in the meeting session, tap the More actions icon from the bottom, and tap Start recording from the menu that comes up.
Step 3: Stop the Recording
After the meeting session, tap the More actions icon again, and tap Stop recording from the menu to stop recording the meeting.
Part 2: How to Automatically Record Microsoft Teams Meetings?
Quite recently, Microsoft integrated a new feature to the Teams app that allows the organizers to automatically record all the meeting sessions that take place. The recording starts automatically as soon as the first participant joins a meeting. This automatic recording function can be easily turned off if the organizer wants to.
You can learn how to record a Teams meeting automatically by following the instructions that are given below:
Step 1: Get to the Meeting with Box
Launch Microsoft Teams on your computer, and use the method explained earlier to get to the Meeting with box by initiating a new meeting.
Step 2: Get to the Meeting options Page
When on the Meeting with box, click Join now to start a new meeting, click the Show participants icon from the upper-right area, and when the Participants box comes up, click Manage permissions.
Step 3: Enable Automatic Recording
On the Meeting options page, turn on the Record automatically switch. Once this is done, you can safely share the invitation link with the people you want to attend the meeting, and Teams will start the recording as soon as the first participant joins in.
Part 3: How to Find Recorded Meetings in Teams?
The recorded files of the Teams meetings are saved to SharePoint in case of a channel meeting, or to the ‘Recordings’ folder on OneDrive if it was any other type of meeting. The processes of locating the Teams meeting files are given below:
For Channel Meetings
- Launch Microsoft Teams
- Click to select the Files option from the left pane
- Click to select Microsoft Teams from the Files pane
- Locate the recorded meeting from the window on the right
For Other Meeting Types
- Get to the Files pane using the method explained in the previous section
- Click to select OneDrive from the Cloud storage section
- Locate the recorded meeting file from the right window
Part 4: How to Share Recorded Teams Meetings?
Sharing the recorded meetings is as easy as sharing any other file. The process to share the recording of a meeting file saved on OneDrive is given below:
- Click to select OneDrive from the Cloud storage section of the Files pane as explained earlier
- Locate and right-click the meeting file that you want to share
- Click Share from the context menu
- Use the Share box that opens next to add the participants you want to access the recorded file
- Click Send to start sharing
Part 5: How to Record Teams Meeting Secretly?
Although Microsoft made Teams quite transparent by sending notifications to all the attendees as soon as you start recording a meeting, sometimes you may not want this to happen. In such a case, you must rely on a third-party app that can record your computer screen behind the scenes.
One such program is Filmora by Wondershare. Although Wondershare Filmora is primarily used for industry-standard post-product tasks such as video editing, apply effects and filters to the motion clips, etc., it offers the option to record computer screen , webcam, and audio as additional features so you don’t have to depend on any other software for screencasting.
Download Mac Version ](https://tools.techidaily.com/wondershare/filmora/download/ )
With that said, the steps that are given below teach how to record Teams meeting secretly with Wondershare Filmora:
Step 1: Get to the Wondershare Screen Recorder Panel
Launch Wondershare Filmora on your PC (a Windows 10 computer is used here for illustration), click the Record menu from the top of the Media window, and click Record PC Screen from the menu that comes down.
Step 2: Configure Recording Preferences
On the Wondershare Screen Recorder panel, expand the advanced options by clicking Settings from the lower section. Next, use the available menus and boxes to set up the recording preferences such as full screen, audio, save location, framerate, recording quality, etc.
Step 3: Start Recording Teams Meeting Secretly
After the recording preferences are set, click the Record button to start the screen recording. After this, use the method explained earlier to join or start a new Microsoft Teams meeting.
Step 4: Stop the Recording and Export
Once the meeting session is over, press F9, or right-click the Screen Recorder icon from the notification area, click Open recorder, and then click the Stop button from the panel that appears next to stop the recording.
Now, you can drag the recorded footage from the Media box to the Filmora timeline at the bottom to start editing the clip, and then can click EXPORT from the top of the interface to save the final version of the video that can be shared on your preferred platform or with your colleagues, team members, managers, etc.
Find out more solutions to record Teams video meeting .
FAQs About Microsoft Teams Meeting Recording
Q1) Can I record a meeting in Microsoft Teams on mobile?
A1) Yes. As long as you are using the correct license that comes along with the recording feature, you can record Microsoft Teams meetings on both Android and iOS devices. The licenses that allow recording are Office 365 Enterprise E1, E3, E5, F3, A1, A3, A5, M365 Business, Business Essentials, or Business Premium.
Q2) Who can start or stop a recording of a Teams meeting?
A2) The organizer of the meeting or a person from the same organization can start or stop the recording.
Q3) Will people know if I start a recording on Teams meeting?
A3) Yes. If you are using the Teams’ built-in recording feature to record a meeting, all the attendees will be notified about it. If you don’t want anyone to know that you are recording a session, you can use an efficient third-party app like Wondershare Filmora, and follow the steps explained earlier to learn how to record Teams meeting behind the scenes.
Richard Bennett
Richard Bennett is a writer and a lover of all things video.
Follow @Richard Bennett
Also read:
- "[New] How To Record The Screen With Adobe Captive"
- "[New] In 2024, 10 Free Web Conferencing Software for Online Meeting (with Screen Sharing)"
- "[New] Premier Live Recording Suite"
- "\"[New] 2024 Approved The Complete Process of Logging Google Meet Chats\""
- "Exploring Essential Screen Recording Software for Educators"
- "\"Optimize Your Livestream Top 5 Best Practices\""
- "[New] MiniScreen Capture Scrutiny and Replacements"
- "[Updated] In 2024, Easy Steam Recordings with Team Fortress 2'S Latest Update"
- "\"Cutting-Edge Approaches for iPhone/iPad Screen Capture for 2024\""
- "\"2024 Approved Maximizing Your Steam Experience with a Switch Pro Controller\""
- "\"[New] In 2024, Master the Art of Easy Webinar Recordings Windows & macOS Advice\""
- "[Updated] Your Ultimate Guide to Effortless Xbox One Image Snaps for 2024"
- "\"[Updated] 2024 Approved RecordingCritique Assessment\""
- "[Updated] The Ultimate Guide to Efficient Mac Screenshotting via Keyboard for 2024"
- "\"[Updated] 2024 Approved Perfecting Google Meet PPT Sessions on Desktop/Tablet\""
- "\"[Updated] In-Depth Review Tunefab's Latest in Screen Capture Tech for 2024\""
- "Sound Capture Gadget Testing for 2024"
- "[Updated] Transcript Download, Analyze Content for 2024"
- "\"Digital Deviants Titles Mirroring GTA V Experience\""
- "\"[New] 2024 Approved Securely Capturing and Storing iTunes Media Content\""
- "[New] Basic Win10 Screen Save Program for 2024"
- "\"2024 Approved Audacity for the Mac Enthusiast Advanced Recording Techniques\""
- "[Updated] Discover the Best Mac GIF Recorders Now, In 2024"
- "In 2024, Techniques for Flawless Live Broadcasting of RL Games"
- "\"In 2024, Guide to Premium-Free Mobile Video Calls - iOS & Android Edition\""
- "[New] Overwatch Playback Techniques Explained for 2024"
- "[New] LightningLapse DelayDox Video for 2024"
- "[Updated] Key Steps to Preserve & Broadcast Live Sports Successfully"
- "\"Practical Steps for Saving Real-Time Chat Sessions for 2024\""
- "\"[Updated] From Amateurs to Pros Mastering Mac Audio in Audacity\""
- "[New] In 2024, A Deeper Dive Into Documenting Gaming Sessions on the PS3"
- "[New] Professional Tips for Sims Game Capture for 2024"
- "The Essentials of Sims 4 Gameplay Recording for 2024"
- "\"[New] In 2024, Leading Edge Quick Frame Gatherer #5\""
- "\"2024 Approved The Ultimate Method for Recording YouTube Videos on Any Device\""
- "\"2024 Approved Top-Rated 5 Web Videography Editing Suites\""
- "[Updated] Best Editor Apps to Polish Your Webcam Recordings for 2024"
- "\"2024 Approved Top 8 Best Zombie Games\""
- "\"[Updated] 2024 Approved Gelato Gaze Guide Thorough Analysis & Detailed Instructions on Ice Cream Monitoring\""
- "\"[Updated] Effortlessly Create and Manage Cross-Platform Communication Channels with Skype Groups for 2024\""
- "[Updated] In 2024, Top 25 Capture Apps for Your Windows 10 Device"
- "\"2024 Approved Smartphone Tools for Crafting Your Ideal Vocal Sound\""
- "In 2024, Scaling Down OBS Video Quality"
- "\"[Updated] Frame-by-Frame Magic Best Video Screenshots\""
- "\"Crafting Compact Comforts Essential MC Abodes for Beginners for 2024\""
- "\"[New] 2024 Approved High-Speed Snapshot & Voice Commentary Assistant Device\""
- "\"[Updated] 2024 Approved Mastering Screen Sharing for PPTs\""
- In 2024, How to Unlock Realme Narzo 60 Pro 5G Phone without PIN
- In 2024, Tips and Tricks for Setting Up your Samsung Galaxy M54 5G Phone Pattern Lock
- 2024 Approved What Slideshow Templates Teach You About Aesthetic
- New Combine, Edit, and Share Best Video Collage Apps for iPhone and iPad for 2024
- 3uTools Virtual Location Not Working On Apple iPhone 6? Fix Now | Dr.fone
- New Guide to Generating Speech in Different Languages With the Best Tools
- Top 4 Android System Repair Software for Lava Blaze Curve 5G Bricked Devices | Dr.fone
- The Ultimate Guide to Get the Rare Candy on Pokemon Go Fire Red On Tecno Phantom V Flip | Dr.fone
- Updated In 2024, Top 10 Calming Websites To Relax Your Mind
- In 2024, Reset iTunes Backup Password Of iPhone 11 Pro Max Prevention & Solution | Dr.fone
- New 2024 Approved Beyond Movie Maker 10 Free Video Editors for Windows Users
- In 2024, How to Come up With the Best Pokemon Team On Apple iPhone SE (2020)? | Dr.fone
- Cellular Network Not Available for Voice Calls On Tecno Spark 10 4G | Dr.fone
- Top 9 Xiaomi Redmi A2 Monitoring Apps for Parental Controls | Dr.fone
- Updated In 2024, Say Goodbye to Cropped Videos The Facebook Aspect Ratio Guide
- New Unlock Cross-Platform Video Editing A Chromebook Users Guide for 2024
- Updated Ornithological Soundscapes MP3 Compilation
- In 2024, How Vivo Y28 5G Mirror Screen to PC? | Dr.fone
- How to Transfer Data After Switching From Tecno Spark 20 to Latest Samsung | Dr.fone
- S Most Popular Free and Open-Source Video Editing Tools
- In 2024, Exploring the Most Reputable Web-Based Communication Tools Today
- Updated Waveform Generation Made Easy 10 Online Tools to Explore
- Can I play MKV movies on Huawei Nova Y91?
- Here Are Some Reliable Ways to Get Pokemon Go Friend Codes For Vivo Y36i | Dr.fone
- 2024 Approved Best Free Video Shrinking Software for Windows 10 Users
- 2024 Approved 10 Best Reaper Plugins You Need to Know (Free Download)
- 2024 Approved Mastering Your Podcast Top 10 Free Software Options to Capture Quality Soundtracks
- In 2024, How to Remove the Activation Lock On your iPad and Apple iPhone 11 Pro without Apple Account
- Updated In 2024, QuickTime Video Speed Control A Beginners Tutorial
- In 2024, How to Use Pokémon Emerald Master Ball Cheat On Tecno Spark Go (2023) | Dr.fone
- In 2024, How to Hide/Fake Snapchat Location on Your Nokia C300 | Dr.fone
- Updated A Comprehensive Guide to PC Speaker Monitoring and Editing via Audacity
- 8 Workable Fixes to the SIM not provisioned MM#2 Error on Vivo X Flip | Dr.fone
- Updated In 2024, Uncovering the Power of Splice A Thorough Video Editing App Review
- The Ultimate Guide to Xiaomi Redmi Note 12 5G Pattern Lock Screen Everything You Need to Know
- New Unhappy with VSDC? Explore These Top Mac Video Editing Options
- Undelete lost call logs from Honor Magic 6 Lite
- The Ultimate List Best Free Video Special Effects Apps for iOS and Android for 2024
- New Silencing Skew Advanced Tactics for Rectifying Audio Anomalies and Enhancing Clarity
- In 2024, The Updated Method to Bypass Lava Agni 2 5G FRP
- New 2024 Approved Common Platforms
- Best Fixes For Honor X7b Hard Reset | Dr.fone
- 2024 Approved Guide to Instantly Diminish Audio Volume Gently
- How to Fix Xiaomi Redmi K70 Pro Find My Friends No Location Found? | Dr.fone
- Title: "[New] In 2024, Mastering Desktop & Mobile Capturing Team Video Conferences"
- Author: Amelia
- Created at : 2024-05-18 04:21:21
- Updated at : 2024-05-19 04:21:21
- Link: https://screen-capture.techidaily.com/new-in-2024-mastering-desktop-and-mobile-capturing-team-video-conferences/
- License: This work is licensed under CC BY-NC-SA 4.0.
