![[New] In 2024, Apex Titles for HD Video Recording Technologies](https://thmb.techidaily.com/6d6520e192a843298c5f3fb60d79f701e9d849b7c957109090842f5892749c79.jpg)
[New] In 2024, Apex Titles for HD Video Recording Technologies
Apex Titles for HD Video Recording Technologies
When customers encounter technical difficulties while using an app or platform, they often seek assistance via emailing, skyping, or calling the technical support team/helpdesk. When there is a misunderstanding, however, hundreds of words or tens of discussions may not provide joyful outcomes. Are you seeking for an easy way to capture videos on your computer? Our article will show you how to record a video on a computer and what screen-recording software you’ll need to get started.
The value of video content is being recognized by content providers, podcasters, and company owners alike. It’s priceless to be able to create studio-quality HD films from the comfort of your own home. Videos can quickly boost your digital presence by allowing you to engage with your audience and complement your other marketing elements. You may film a steps video detailing how the problem occurs and how to repair it to minimize misconceptions and unpleasant user experiences. A helpdesk employee can rapidly duplicate customers’ difficulties by watching these types of films, and clients can quickly figure out what’s wrong and take the steps to fix it.

1. Filmora - HD Video Recorder for Computer
Are you trying to figure out the best approach to capture video from many sources? Filmora HD Screen Recorder is a good option. Not only can you adjust settings on the fly, but you can also pick between screen capture and video recording from your camera or any other on-screen source. Filmora HD Recorder provides a user-friendly interface and complex capabilities like scheduling recordings and capturing just a portion of the screen rather than the whole screen. You may also use the movies to draw on to help you remember what you’ve learned.
For Win 7 or later (64-bit)
For macOS 10.12 or later
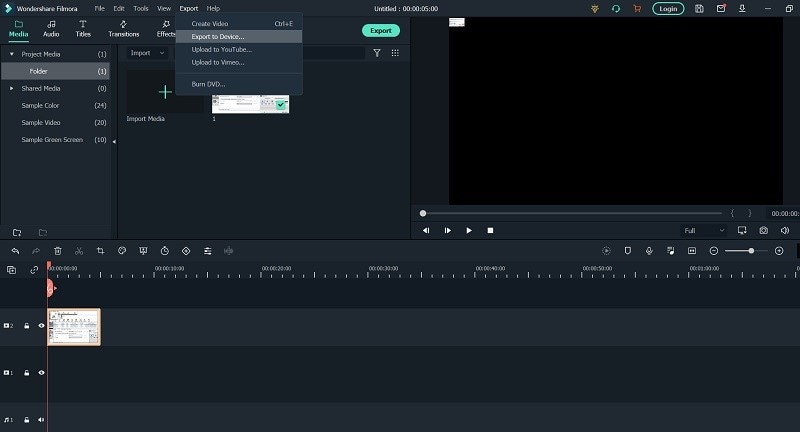
Steps to Record HD Videos with Filmora:
Step 1: Get Filmora Screen Recorder and install it.
The website has the software available for download. To install the video capture program, run the downloaded file and follow the on-screen instructions. Double-click the application icon to start the recorder after that.

Step 2: Make Adjustments to The Parameters
Click Preferences in the sidebar to adjust the capture settings before you start recording.

Step 3: Make a Video on Your Computer
To begin the recording process, click the record button. Before the screen capture starts, there will be a 3-second countdown. If necessary, you may pause the recording at any time. Click the Stop button to end the recording.

Step 4: Finish Editing and Save Your Video
You may now edit the recorded video to delete any superfluous elements. To do so, move the mouse to the undesirable segment’s edge and click Cut. As required, repeat the process. Then choose the portion you wish to get rid of and press the Delete fragment button.
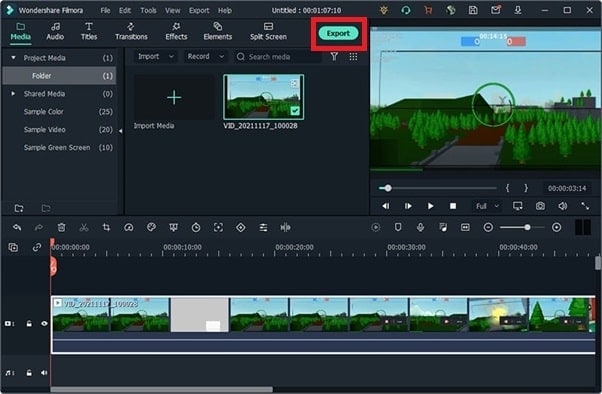
Step 5: Save the HD Recording to Your Computer
After that, choose Export. You may modify the output format, file name, and export folder in the dialog box that appears. After you’ve completed all of the required adjustments, click Save.
2. LiteCam - HD Webcam Recorder
LiteCam screen recorder is a Windows application that allows users to capture screencast films in high definition. As a result, it’s one of the greatest options for capturing streaming movies, webcasts, podcasts, and even webcam video. This article offers a thorough examination of the program. LiteCam is designed with a basic user interface to make the recording procedure as easy as possible, and then utilize the in-built editor to perfect the video. It’s very handy for folks who want to make video lessons and upload them on YouTube. It’s a full solution that lets users record everything that happens on the screen, including sound, using the built-in microphone.
Step 1: Download LiteCam and Install It on Your Computer
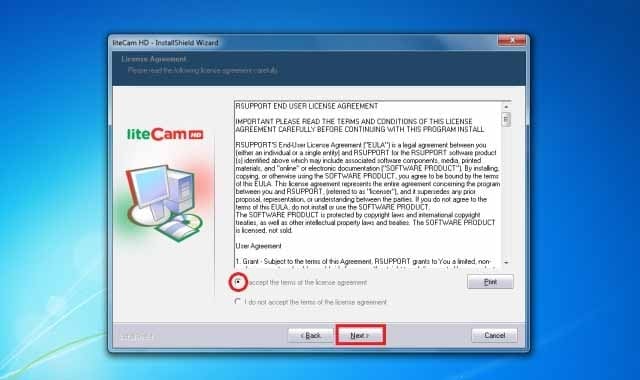
The first step is to download and install the application on your computer. While you may download a free trial version of the application, it should be noted that its usefulness will be restricted.
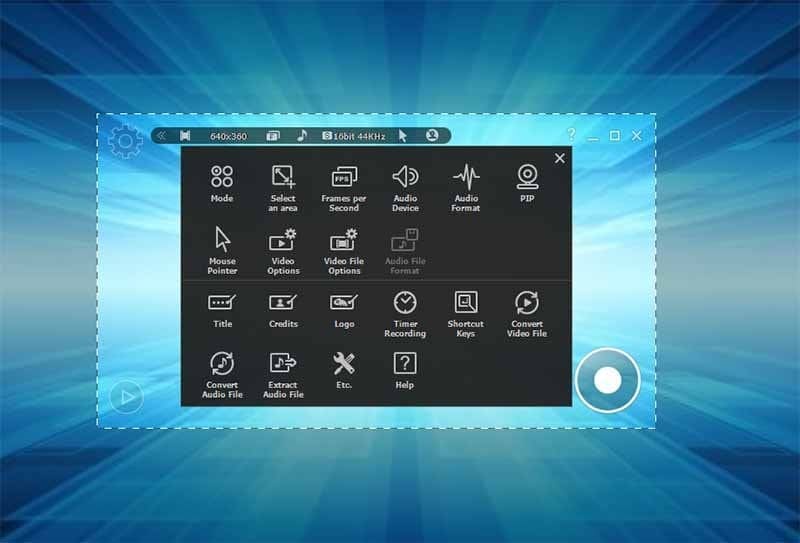
Step 2: Customize the Settings
If this is your first time using LiteCam, you may need to adjust the settings to your liking or depending on the sort of video you wish to shoot. If you wish to record the sound, you need also to switch on the microphone. To begin altering the recording settings, choose the “Video Recorder” option in the main window. You may choose to record the whole screen or a specific area of the screen here.
Step 3: Start Recording
Once you’ve got everything set up the way you want it, click Record to start recording the screen. Keep in mind that throughout the recording, you may utilize the cursor effects to emphasize the video. To conclude the recording, press the record button again. After that, you may watch the recording and make adjustments to it using the editing option. Remember to save the video when you’re finished.
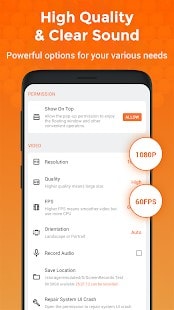
3. XRecorder - HD Recorder for Android
When it comes to video tools, XRecorder is a well-known developer on Google Play. Its screen recorder app is one of the most popular on the market. It may be used for a variety of tasks, including filming instructional videos and video games. There’s also internal audio recording and a light video editor to tidy things up, and there’s no watermark. It performs well for the task at hand. Some of the features need a membership, but it’s generally excellent. Many streaming providers now offer smartphone compatibility. Two of the most popular are Twitch and YouTube Gaming. You just broadcast your games as usual. After you’ve finished using both services, you may download your video. It’s an excellent option for gamers in particular.
Step 1. Launch the Settings app on your iOS device.

Step 2. In the next step, you need to scroll down and tap on the Camera button.

Step 3. Tap Record Video and then Select a resolution and frame rate to record video at. Note that shooting the 4K options take the most space.
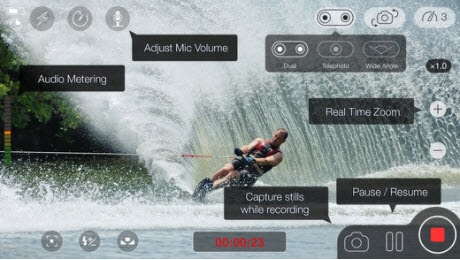
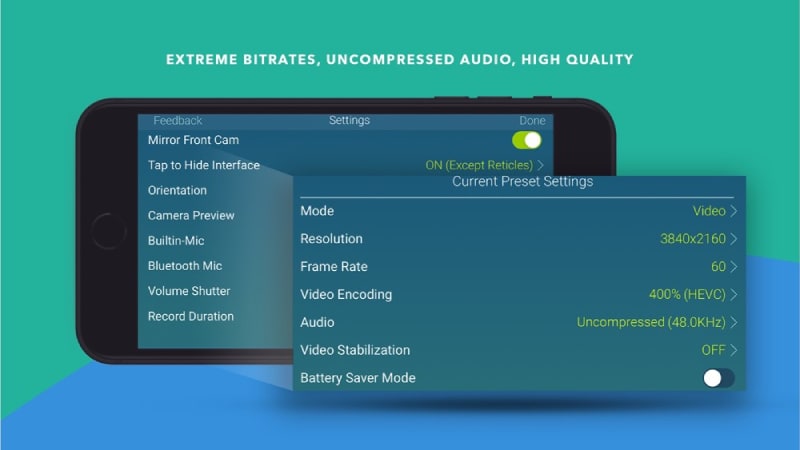
4. MoviePro - Best HD Video Recorder for iOS
The MoviePro app is the greatest among the top video recording apps since it allows you to customize every part of the settings when shooting films on your iPhone. MoviePro is a free video capture program that allows you to record screen items and save them in AVI format. With on-screen audio meters and Bluetooth microphone input choices, audio recording and monitoring possibilities are just as varied. This program has several useful features that will make your life easier. It comes with several useful capabilities, including high-definition screen recording, video compression, and more. The software comes with a plethora of functionality, including manual controls for practically all of the program’s functionalities and a variety of video recording possibilities.
Step 1. On your iOS device, go to the App Store and download the app.
Step 2. Scroll down to Camera and tap it. Tap the Record Video button.
Step 3. To record video, choose a resolution and frame rate. It’s worth noting that filming in 4K takes up the most space.

Conclusion
It’s critical to understand a few things about these programs before choosing the one that’s right for you. You can choose which one is ideal for you by carefully considering their attributes. In addition to pictures, you may need to collect videos, particularly for how-to instructions and tutorials for a variety of presentations. Video might also be recorded for personal or entertainment purposes. Regardless of your objectives, the good news is that there are several HD video recorder software solutions available on the Internet.
For macOS 10.12 or later
Steps to Record HD Videos with Filmora:
Step 1: Get Filmora Screen Recorder and install it.
The website has the software available for download. To install the video capture program, run the downloaded file and follow the on-screen instructions. Double-click the application icon to start the recorder after that.
Step 2: Make Adjustments to The Parameters
Click Preferences in the sidebar to adjust the capture settings before you start recording.
Step 3: Make a Video on Your Computer
To begin the recording process, click the record button. Before the screen capture starts, there will be a 3-second countdown. If necessary, you may pause the recording at any time. Click the Stop button to end the recording.
Step 4: Finish Editing and Save Your Video
You may now edit the recorded video to delete any superfluous elements. To do so, move the mouse to the undesirable segment’s edge and click Cut. As required, repeat the process. Then choose the portion you wish to get rid of and press the Delete fragment button.
Step 5: Save the HD Recording to Your Computer
After that, choose Export. You may modify the output format, file name, and export folder in the dialog box that appears. After you’ve completed all of the required adjustments, click Save.
2. LiteCam - HD Webcam Recorder
LiteCam screen recorder is a Windows application that allows users to capture screencast films in high definition. As a result, it’s one of the greatest options for capturing streaming movies, webcasts, podcasts, and even webcam video. This article offers a thorough examination of the program. LiteCam is designed with a basic user interface to make the recording procedure as easy as possible, and then utilize the in-built editor to perfect the video. It’s very handy for folks who want to make video lessons and upload them on YouTube. It’s a full solution that lets users record everything that happens on the screen, including sound, using the built-in microphone.
Step 1: Download LiteCam and Install It on Your Computer

The first step is to download and install the application on your computer. While you may download a free trial version of the application, it should be noted that its usefulness will be restricted.
Step 2: Customize the Settings
If this is your first time using LiteCam, you may need to adjust the settings to your liking or depending on the sort of video you wish to shoot. If you wish to record the sound, you need also to switch on the microphone. To begin altering the recording settings, choose the “Video Recorder” option in the main window. You may choose to record the whole screen or a specific area of the screen here.
Step 3: Start Recording
Once you’ve got everything set up the way you want it, click Record to start recording the screen. Keep in mind that throughout the recording, you may utilize the cursor effects to emphasize the video. To conclude the recording, press the record button again. After that, you may watch the recording and make adjustments to it using the editing option. Remember to save the video when you’re finished.
3. XRecorder - HD Recorder for Android
When it comes to video tools, XRecorder is a well-known developer on Google Play. Its screen recorder app is one of the most popular on the market. It may be used for a variety of tasks, including filming instructional videos and video games. There’s also internal audio recording and a light video editor to tidy things up, and there’s no watermark. It performs well for the task at hand. Some of the features need a membership, but it’s generally excellent. Many streaming providers now offer smartphone compatibility. Two of the most popular are Twitch and YouTube Gaming. You just broadcast your games as usual. After you’ve finished using both services, you may download your video. It’s an excellent option for gamers in particular.
Step 1. Launch the Settings app on your iOS device.
Step 2. In the next step, you need to scroll down and tap on the Camera button.

Step 3. Tap Record Video and then Select a resolution and frame rate to record video at. Note that shooting the 4K options take the most space.
4. MoviePro - Best HD Video Recorder for iOS
The MoviePro app is the greatest among the top video recording apps since it allows you to customize every part of the settings when shooting films on your iPhone. MoviePro is a free video capture program that allows you to record screen items and save them in AVI format. With on-screen audio meters and Bluetooth microphone input choices, audio recording and monitoring possibilities are just as varied. This program has several useful features that will make your life easier. It comes with several useful capabilities, including high-definition screen recording, video compression, and more. The software comes with a plethora of functionality, including manual controls for practically all of the program’s functionalities and a variety of video recording possibilities.
Step 1. On your iOS device, go to the App Store and download the app.
Step 2. Scroll down to Camera and tap it. Tap the Record Video button.
Step 3. To record video, choose a resolution and frame rate. It’s worth noting that filming in 4K takes up the most space.
Conclusion
It’s critical to understand a few things about these programs before choosing the one that’s right for you. You can choose which one is ideal for you by carefully considering their attributes. In addition to pictures, you may need to collect videos, particularly for how-to instructions and tutorials for a variety of presentations. Video might also be recorded for personal or entertainment purposes. Regardless of your objectives, the good news is that there are several HD video recorder software solutions available on the Internet.
For macOS 10.12 or later
Steps to Record HD Videos with Filmora:
Step 1: Get Filmora Screen Recorder and install it.
The website has the software available for download. To install the video capture program, run the downloaded file and follow the on-screen instructions. Double-click the application icon to start the recorder after that.
Step 2: Make Adjustments to The Parameters
Click Preferences in the sidebar to adjust the capture settings before you start recording.
Step 3: Make a Video on Your Computer
To begin the recording process, click the record button. Before the screen capture starts, there will be a 3-second countdown. If necessary, you may pause the recording at any time. Click the Stop button to end the recording.
Step 4: Finish Editing and Save Your Video
You may now edit the recorded video to delete any superfluous elements. To do so, move the mouse to the undesirable segment’s edge and click Cut. As required, repeat the process. Then choose the portion you wish to get rid of and press the Delete fragment button.
Step 5: Save the HD Recording to Your Computer
After that, choose Export. You may modify the output format, file name, and export folder in the dialog box that appears. After you’ve completed all of the required adjustments, click Save.
2. LiteCam - HD Webcam Recorder
LiteCam screen recorder is a Windows application that allows users to capture screencast films in high definition. As a result, it’s one of the greatest options for capturing streaming movies, webcasts, podcasts, and even webcam video. This article offers a thorough examination of the program. LiteCam is designed with a basic user interface to make the recording procedure as easy as possible, and then utilize the in-built editor to perfect the video. It’s very handy for folks who want to make video lessons and upload them on YouTube. It’s a full solution that lets users record everything that happens on the screen, including sound, using the built-in microphone.
Step 1: Download LiteCam and Install It on Your Computer
The first step is to download and install the application on your computer. While you may download a free trial version of the application, it should be noted that its usefulness will be restricted.
Step 2: Customize the Settings
If this is your first time using LiteCam, you may need to adjust the settings to your liking or depending on the sort of video you wish to shoot. If you wish to record the sound, you need also to switch on the microphone. To begin altering the recording settings, choose the “Video Recorder” option in the main window. You may choose to record the whole screen or a specific area of the screen here.
Step 3: Start Recording
Once you’ve got everything set up the way you want it, click Record to start recording the screen. Keep in mind that throughout the recording, you may utilize the cursor effects to emphasize the video. To conclude the recording, press the record button again. After that, you may watch the recording and make adjustments to it using the editing option. Remember to save the video when you’re finished.
3. XRecorder - HD Recorder for Android
When it comes to video tools, XRecorder is a well-known developer on Google Play. Its screen recorder app is one of the most popular on the market. It may be used for a variety of tasks, including filming instructional videos and video games. There’s also internal audio recording and a light video editor to tidy things up, and there’s no watermark. It performs well for the task at hand. Some of the features need a membership, but it’s generally excellent. Many streaming providers now offer smartphone compatibility. Two of the most popular are Twitch and YouTube Gaming. You just broadcast your games as usual. After you’ve finished using both services, you may download your video. It’s an excellent option for gamers in particular.
Step 1. Launch the Settings app on your iOS device.
Step 2. In the next step, you need to scroll down and tap on the Camera button.
Step 3. Tap Record Video and then Select a resolution and frame rate to record video at. Note that shooting the 4K options take the most space.
4. MoviePro - Best HD Video Recorder for iOS
The MoviePro app is the greatest among the top video recording apps since it allows you to customize every part of the settings when shooting films on your iPhone. MoviePro is a free video capture program that allows you to record screen items and save them in AVI format. With on-screen audio meters and Bluetooth microphone input choices, audio recording and monitoring possibilities are just as varied. This program has several useful features that will make your life easier. It comes with several useful capabilities, including high-definition screen recording, video compression, and more. The software comes with a plethora of functionality, including manual controls for practically all of the program’s functionalities and a variety of video recording possibilities.
Step 1. On your iOS device, go to the App Store and download the app.
Step 2. Scroll down to Camera and tap it. Tap the Record Video button.
Step 3. To record video, choose a resolution and frame rate. It’s worth noting that filming in 4K takes up the most space.

Conclusion
It’s critical to understand a few things about these programs before choosing the one that’s right for you. You can choose which one is ideal for you by carefully considering their attributes. In addition to pictures, you may need to collect videos, particularly for how-to instructions and tutorials for a variety of presentations. Video might also be recorded for personal or entertainment purposes. Regardless of your objectives, the good news is that there are several HD video recorder software solutions available on the Internet.
- Title: [New] In 2024, Apex Titles for HD Video Recording Technologies
- Author: Amelia
- Created at : 2024-07-18 18:33:47
- Updated at : 2024-07-19 18:33:47
- Link: https://screen-capture.techidaily.com/new-in-2024-apex-titles-for-hd-video-recording-technologies/
- License: This work is licensed under CC BY-NC-SA 4.0.