![[New] Fonepaw Screen Recorder Review](https://thmb.techidaily.com/238e2de8d5663845563adee13d68f244664dc4975f435870883240d8e13b1f76.jpg)
[New] Fonepaw Screen Recorder Review

Fonepaw Screen Recorder Review
Finding a free screen recorder with which you can record your screen without any watermark is very difficult. Even if you find such a free screen recorder, their lack of standard features makes them almost useless. This is where FonePaw Screen Recorder stands out as its free version lets you record your screen without any watermark. The free version comes with all the features that its premium version offers. The only limitation is that you can record up to 3 minutes of video at a time.
You can record the screen and the webcam individually as well as collectively. Similarly, you can record sound from microphone and system speaker. Among the advanced features, you can schedule recording in your absence and add real-time annotations. Check out the complete review of FonePaw Recorder below.
Part 1. Key Features of FonePaw Screen Recorder
FonePaw Recorder is a professional-grade screen recorder, and here are the features that make it stand out.
Versatile Recording - You can record screen and webcam individually as well as simultaneously. You can record the entire screen as well as customized area. You can lock and record a particular window and record all the parts of the screen excluding a window.
Record Audio - You can record sound from the system speaker as well as the microphone individually as well as simultaneously. On top of that, the software offers sound enhancement and noise cancellation for microphone.
Schedule Recording - You can record your screen in your absence by scheduling the task of recording. You can set the record duration and lock windows to record. Therefore, you can record live sports, webinars, lectures and much more.
Real-Time Addition - You can add different drawings and arrows as well as annotations live while recording. This is really useful when you are recording a tutorial video. Besides, you can highlight your mouse cursor for better understanding.
Screenshot, GIF, and Clip - You can capture screenshots while recording, make GIF from the recorded videos and trim out clips as necessary.
Part 2. How to Use FonePaw Screen Recorder
FonePaw Recorder supports different formats starting from MP4 and MOV to WMV and AVI. You can record screen video at Full HD with frame rate up to 60FPS. Here are the steps on how to record the screen with FonePaw Screen Recording software.
Step 1: Go for FonePaw Screen Recorder download and install the application on your computer.
Step 2: Launch the application and click on Video Recorder option if you want to record your desktop. For recording gameplay, click on Game Recorder.

Step 3: On the next screen, toggle on the Display tab and you have to select full screen or custom screen. Under the custom screen, you can either select a certain fixed region or select a custom region.

Step 4: You can toggle on webcam if you want to record the screen and the webcam simultaneously. Similarly, choose the audio source as applicable.

Step 5: Finally, click on REC button located at the top-left corner. This will start recording and you can add texts and drawings on the screen while recording.
Step 6: When you need to stop, click on Stop button at the top of the bar. You will get a preview and you can save the video on your PC.
Part 3. Pros and Cons of FonePaw Recorder
Please note that the free version allows recording of the screen up to 3 minutes only and hence, you have to eventually go for its premium version. Therefore, before subscribing you any plan, you should know the pros and cons of FonePaw Screen Recorder Mac and Windows.
Pros
- Record full screen or custom screen.
- Capture screen as well as webcam.
- Schedule recording and lock window.
- Record audio from mic and system speaker.
- Add annotations and drawings in real-time.
- Different file formats supported.
- Take screenshots, make GIFs and clips.
Cons
- 4K recording not possible.
- Very limited editing options.
- Free version is more for testing than real usage.
Part 4. Is There a Better Alternative Available?
There are certain features that FonePaw Recorder clearly lacks and this makes the software not an ideal choice for professional video creators. If you are not satisfied by the screen recording software from FonePaw and you are looking for a better alternative that covers up its weaknesses, Filmora Screen Recording Software is the best alternative.
Filmora is a professional screen recorder with a built-in video editor. Therefore, you get all the features that you get on FonePaw Recording software. On top of those, Filmora has all the features that FonePaw lacks. You can record your screen up to 4K resolution. The video editor has loads of features to make your recorder video perfect from all perspectives. Here are the steps to record the screen with Filmora.
Step 1: Download and install Filmora on your computer.
For Win 7 or later (64-bit)
For macOS 10.12 or later
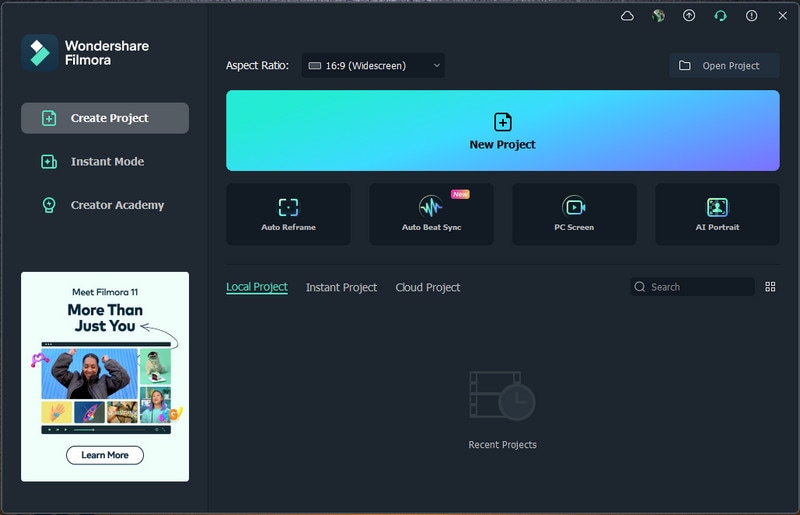
Step 2: Launch the application and click on New Project.
Step 3: Click on Record - Record PC Screen option.

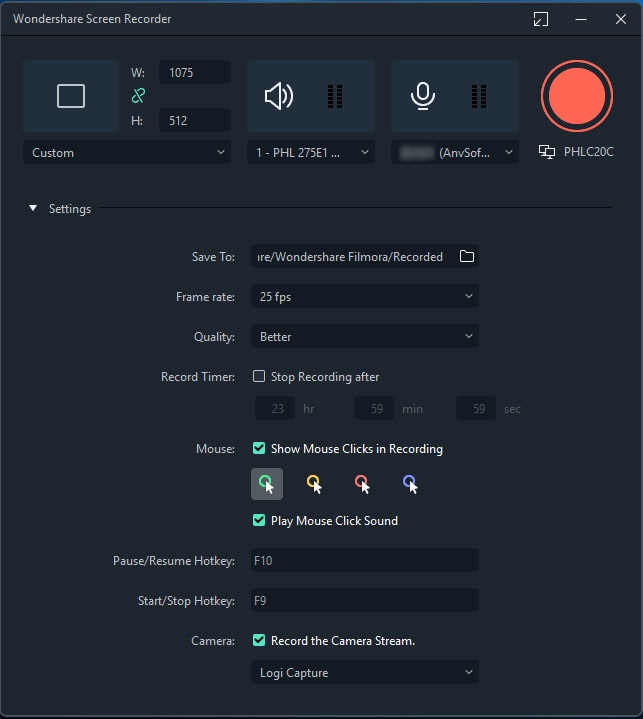
Step 4: Select the screen size and configure the audio sources.
Step 5: Click on the Record button to start recording. You will get a few seconds to set up your screen that you want to record.

Conclusion
FonePaw Screen Recorder Mac and Windows is good enough for regular screen recording. However, it is not a great recorder primarily because it does not allow 4K recording and 4K videos are what professionals love to record. Therefore, for general users, FonePaw recording software gets the job done while professional video creators can opt for Wondershare Filmora as the best alternative.
Cons
- 4K recording not possible.
- Very limited editing options.
- Free version is more for testing than real usage.
Part 4. Is There a Better Alternative Available?
There are certain features that FonePaw Recorder clearly lacks and this makes the software not an ideal choice for professional video creators. If you are not satisfied by the screen recording software from FonePaw and you are looking for a better alternative that covers up its weaknesses, Filmora Screen Recording Software is the best alternative.
Filmora is a professional screen recorder with a built-in video editor. Therefore, you get all the features that you get on FonePaw Recording software. On top of those, Filmora has all the features that FonePaw lacks. You can record your screen up to 4K resolution. The video editor has loads of features to make your recorder video perfect from all perspectives. Here are the steps to record the screen with Filmora.
Step 1: Download and install Filmora on your computer.
For Win 7 or later (64-bit)
For macOS 10.12 or later
Step 2: Launch the application and click on New Project.
Step 3: Click on Record - Record PC Screen option.

Step 4: Select the screen size and configure the audio sources.
Step 5: Click on the Record button to start recording. You will get a few seconds to set up your screen that you want to record.

Conclusion
FonePaw Screen Recorder Mac and Windows is good enough for regular screen recording. However, it is not a great recorder primarily because it does not allow 4K recording and 4K videos are what professionals love to record. Therefore, for general users, FonePaw recording software gets the job done while professional video creators can opt for Wondershare Filmora as the best alternative.
Cons
- 4K recording not possible.
- Very limited editing options.
- Free version is more for testing than real usage.
Part 4. Is There a Better Alternative Available?
There are certain features that FonePaw Recorder clearly lacks and this makes the software not an ideal choice for professional video creators. If you are not satisfied by the screen recording software from FonePaw and you are looking for a better alternative that covers up its weaknesses, Filmora Screen Recording Software is the best alternative.
Filmora is a professional screen recorder with a built-in video editor. Therefore, you get all the features that you get on FonePaw Recording software. On top of those, Filmora has all the features that FonePaw lacks. You can record your screen up to 4K resolution. The video editor has loads of features to make your recorder video perfect from all perspectives. Here are the steps to record the screen with Filmora.
Step 1: Download and install Filmora on your computer.
For Win 7 or later (64-bit)
For macOS 10.12 or later
Step 2: Launch the application and click on New Project.
Step 3: Click on Record - Record PC Screen option.

Step 4: Select the screen size and configure the audio sources.
Step 5: Click on the Record button to start recording. You will get a few seconds to set up your screen that you want to record.

Conclusion
FonePaw Screen Recorder Mac and Windows is good enough for regular screen recording. However, it is not a great recorder primarily because it does not allow 4K recording and 4K videos are what professionals love to record. Therefore, for general users, FonePaw recording software gets the job done while professional video creators can opt for Wondershare Filmora as the best alternative.
Cons
- 4K recording not possible.
- Very limited editing options.
- Free version is more for testing than real usage.
Part 4. Is There a Better Alternative Available?
There are certain features that FonePaw Recorder clearly lacks and this makes the software not an ideal choice for professional video creators. If you are not satisfied by the screen recording software from FonePaw and you are looking for a better alternative that covers up its weaknesses, Filmora Screen Recording Software is the best alternative.
Filmora is a professional screen recorder with a built-in video editor. Therefore, you get all the features that you get on FonePaw Recording software. On top of those, Filmora has all the features that FonePaw lacks. You can record your screen up to 4K resolution. The video editor has loads of features to make your recorder video perfect from all perspectives. Here are the steps to record the screen with Filmora.
Step 1: Download and install Filmora on your computer.
For Win 7 or later (64-bit)
For macOS 10.12 or later
Step 2: Launch the application and click on New Project.
Step 3: Click on Record - Record PC Screen option.

Step 4: Select the screen size and configure the audio sources.
Step 5: Click on the Record button to start recording. You will get a few seconds to set up your screen that you want to record.

Conclusion
FonePaw Screen Recorder Mac and Windows is good enough for regular screen recording. However, it is not a great recorder primarily because it does not allow 4K recording and 4K videos are what professionals love to record. Therefore, for general users, FonePaw recording software gets the job done while professional video creators can opt for Wondershare Filmora as the best alternative.
Also read:
- [New] In 2024, Efficient Entry PowerPoint Recordings
- [New] Unbeatable Free Webcam Matchups for 2024
- [Updated] Essential HD Screenshots for Mac (Limit 156 Chars)
- [Updated] In 2024, Best Practices for Documenting Live-Streamed Sporting Matches
- [Updated] Social Savvy Fetching and Storing Twitter's Animated GIFs
- 2024 Approved IPhone Mastery Complete Guide to Capturing Podcasts
- High-Ranking Asian Vernaculars: Archive, Access Swiftly
- In 2024, How To Track IMEI Number Of Samsung Galaxy A54 5G Through Google Earth?
- Leading Websites to Shop at for Premium Quality Flat Screen TVs
- Title: [New] Fonepaw Screen Recorder Review
- Author: Amelia
- Created at : 2024-10-03 19:10:40
- Updated at : 2024-10-10 01:59:12
- Link: https://screen-capture.techidaily.com/new-fonepaw-screen-recorder-review/
- License: This work is licensed under CC BY-NC-SA 4.0.