
!["[New] 2024 Approved The Complete Guide to iPhone Voice Memos Setup"](https://www.lifewire.com/thmb/17eYx3JlNgYWrNsT2X2f6cCUjf0=/400x300/filters:no_upscale():max_bytes(150000):strip_icc():format(webp)/edit-tweet-after-publish-3476767-34af9aa3b62b4bf4b11891460076916b.png)
"[New] 2024 Approved The Complete Guide to iPhone Voice Memos Setup"
The Complete Guide to iPhone Voice Memos Setup
If you want to record your voice or record someone speaking to you, you can do it instantly on your iPhone without installing any third-party app. This is because iPhone comes with a pre-installed voice recording app called Voice Memos. You can record with iPhone’s microphone, Bluetooth headset as well as any external microphone. Once you record your voice memo, the app automatically saves it with the location name.
You can also just record but also play the recording as well as perform basic editing. You can use pinch to zoom to editing minutely and precisely. Moreover, you can cut off background noise and trim recording wherever required. In this article, we will illustrate how to record voice memo on iPhone.
Filmora Audio Recorder
Record computer system audio
Capture microphone audio
Customize recording volume
Record screen and webcam as well
1. How To Record with Voice Memo iPhone
First, try to get the best position for your iPhone for quality results. Don’t hold the phone in your hand. It will be better to make it stand firmly so that there is no unwanted noise caused due to movements. Place the microphone at the source of the recording. Here are the steps you have to follow to record voice memos, lectures, interviews, voice notes, songs and likewise with Voice Memo app iPhone.
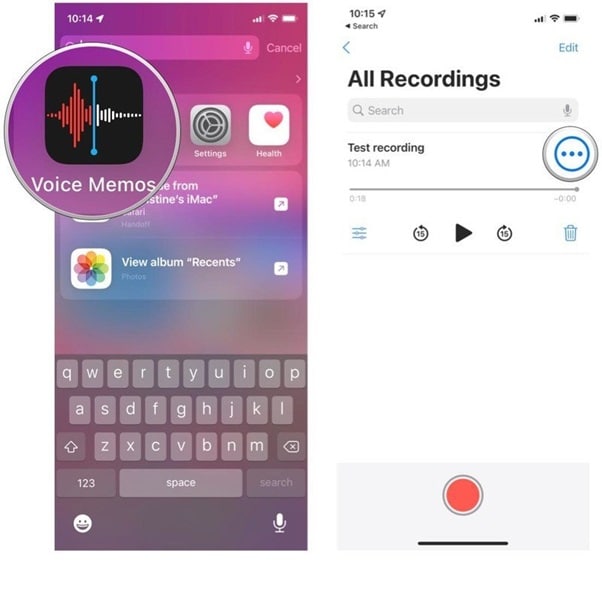
Step 1: Launch Voice Memos on your iPhone.
Step 2: At the bottom of the screen, you will have to tap on the big red circle Record button.
Step 3: Start speaking and the recording is going on in the background. You can check the waves to confirm that your voice is getting recorded.
Step 4: Tap anywhere on the recording pane to see the Pause button in case you want to pause now and resume later.
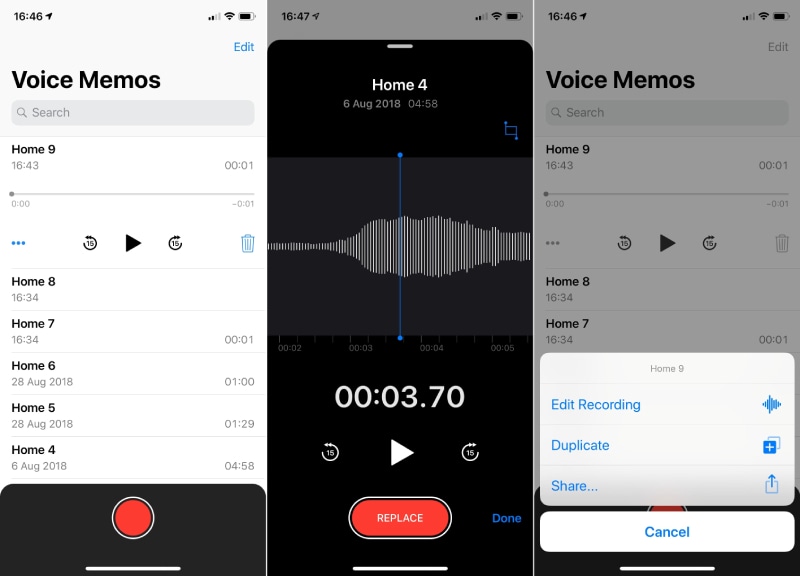
Step 6: The app also allows you to go forward or backward by 15 seconds by tapping the Rewind or Forward buttons.
Step 7: Once you are done recording, you will have to tap Done button. When there is no extra panel, you can tap on Stop button.
Note: To listen to a voice memo, you need to launch Voice Memos app. You will see all the recordings and select the preferred voice memo by tapping on it. Then you will have to tap on the Play button to start listening.

**How To Trim and Edit A Voice Memo?
There are times when there could be some areas in your recording where you have made some mistakes or recorded something unnecessary. You need to trim your recording to eliminate such unnecessary parts easily. Here are the steps to trim your recorded voice memo.
Step 1: Launch iPhone voice memo app.
Step 2: Select the voice memo which you want to trim.
Step 3: Tap on three-dot More button.
Step 4: Choose Edit Recording option.
Step 5: Tap on the Trim button.
Step 6: By using your finger, you can easily drag the trim sliders from any end according to your trimming requirements.
Step 7: Now, you have to tap on Delete option to remove the section between the trim sliders.
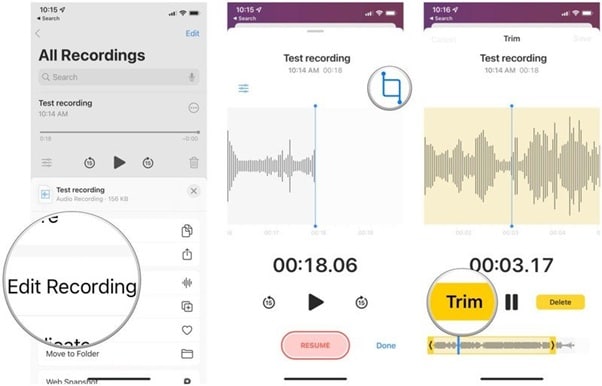
Step 8: Finally, you will have to tap on Save followed by Done.
**How To Delete or Share Voice Memos?
There are times when you record voice memo on iPhone and listen to your recording and you hate it. You can delete it instantly and start over again. On the contrary, you may love the recording and want to share with your friends instantly for feedback. Here are the steps to delete any recording.
Step 1: On your iPhone, you will have to launch Voice Memos app.
Step 2: Select the recording that you want to delete on the home screen of the app.
Step 3: Tap on Trash icon to delete the recording.
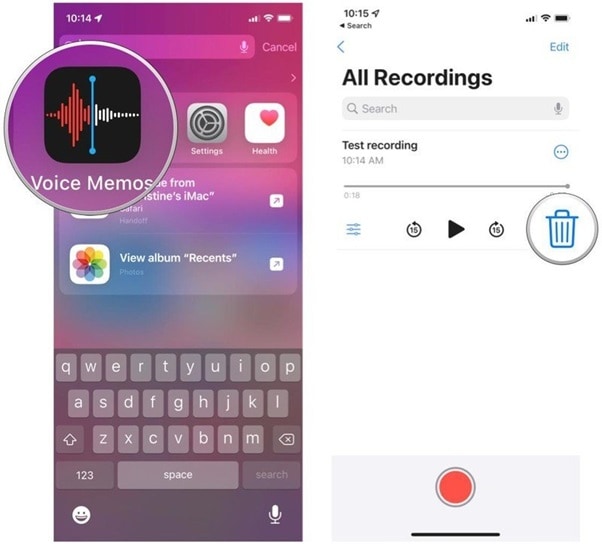
The deleted recording will be in the Deleted folder for 30 days after deletion. Thereafter, it will disappear permanently. If you want, you can access the deleted audio file back by going to the Recently Deleted option. Tap on the recording that you want to restore and tap on Restore icon.
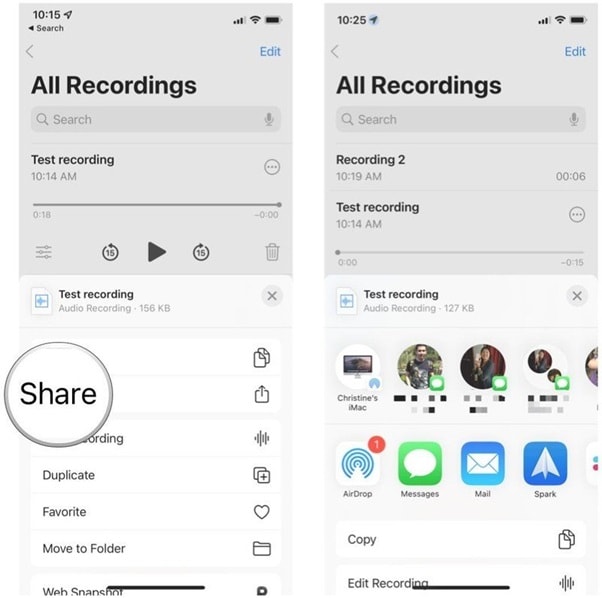
Here are the steps to share any recording instantly from iPhone voice memo app.
Step 1: Launch the app Voice Memos on your iPhone.
Step 2: You will now have to select the voice memo that you are looking to share.
Step 3: Tap on the three-dot More button.
Step 4: Finally, tap on Share option.
Step 5: The app will now allow you to choose the app where you want to share the voice recording.
FAQs About Voice Memos app -
Where is the voice memo app on iPhone 7?
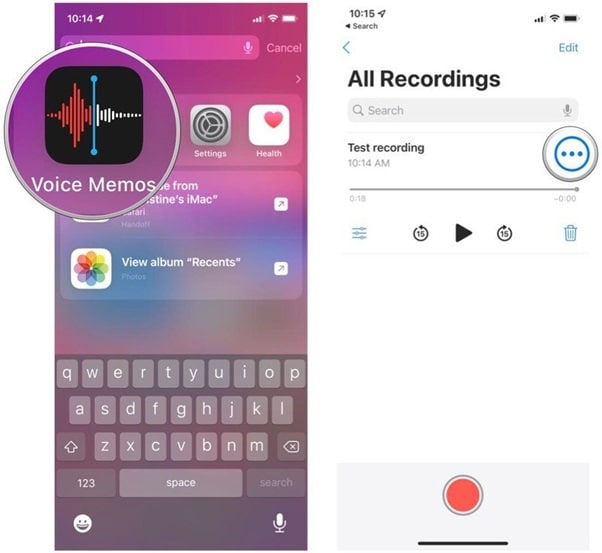
If you have an older iPhone or iOS version, you may find it difficult to spot Voice Memos app. You can find Voice Memos app on iPhone 7 by taking the following steps.
- Swipe down and in the search box, type “voice memos”.
- Voice memos app should appear on the search results instantly. You can also check the folder name where the app is present.
- For now, tap on Voice Memos icon on the search result to open it immediately.
Why I cannot see Voice Memos app?
If you have the latest iPhone or iOS version, you can access Voice Memos directly from Control Center. However, if you do not see Voice Memos icon, you need to activation Voice Memos first.
Go to Settings and tap on your Apple ID. Go to iCloud option and toggle on Voice Memos option. Now, Voice Memos icon should appear on Control Center for quick access.
How long can voice memos be on iPhone?
There is no limit of recording time when it comes to recording a voice memo or note through Voice Memos app. However, the recording can stop abruptly if there is no more space available on your iPhone.
1. How To Record with Voice Memo iPhone
First, try to get the best position for your iPhone for quality results. Don’t hold the phone in your hand. It will be better to make it stand firmly so that there is no unwanted noise caused due to movements. Place the microphone at the source of the recording. Here are the steps you have to follow to record voice memos, lectures, interviews, voice notes, songs and likewise with Voice Memo app iPhone.
Step 1: Launch Voice Memos on your iPhone.
Step 2: At the bottom of the screen, you will have to tap on the big red circle Record button.
Step 3: Start speaking and the recording is going on in the background. You can check the waves to confirm that your voice is getting recorded.
Step 4: Tap anywhere on the recording pane to see the Pause button in case you want to pause now and resume later.
Step 6: The app also allows you to go forward or backward by 15 seconds by tapping the Rewind or Forward buttons.
Step 7: Once you are done recording, you will have to tap Done button. When there is no extra panel, you can tap on Stop button.
Note: To listen to a voice memo, you need to launch Voice Memos app. You will see all the recordings and select the preferred voice memo by tapping on it. Then you will have to tap on the Play button to start listening.
**How To Trim and Edit A Voice Memo?
There are times when there could be some areas in your recording where you have made some mistakes or recorded something unnecessary. You need to trim your recording to eliminate such unnecessary parts easily. Here are the steps to trim your recorded voice memo.
Step 1: Launch iPhone voice memo app.
Step 2: Select the voice memo which you want to trim.
Step 3: Tap on three-dot More button.
Step 4: Choose Edit Recording option.
Step 5: Tap on the Trim button.
Step 6: By using your finger, you can easily drag the trim sliders from any end according to your trimming requirements.
Step 7: Now, you have to tap on Delete option to remove the section between the trim sliders.
Step 8: Finally, you will have to tap on Save followed by Done.
**How To Delete or Share Voice Memos?
There are times when you record voice memo on iPhone and listen to your recording and you hate it. You can delete it instantly and start over again. On the contrary, you may love the recording and want to share with your friends instantly for feedback. Here are the steps to delete any recording.
Step 1: On your iPhone, you will have to launch Voice Memos app.
Step 2: Select the recording that you want to delete on the home screen of the app.
Step 3: Tap on Trash icon to delete the recording.
The deleted recording will be in the Deleted folder for 30 days after deletion. Thereafter, it will disappear permanently. If you want, you can access the deleted audio file back by going to the Recently Deleted option. Tap on the recording that you want to restore and tap on Restore icon.
Here are the steps to share any recording instantly from iPhone voice memo app.
Step 1: Launch the app Voice Memos on your iPhone.
Step 2: You will now have to select the voice memo that you are looking to share.
Step 3: Tap on the three-dot More button.
Step 4: Finally, tap on Share option.
Step 5: The app will now allow you to choose the app where you want to share the voice recording.
FAQs About Voice Memos app -
Where is the voice memo app on iPhone 7?
If you have an older iPhone or iOS version, you may find it difficult to spot Voice Memos app. You can find Voice Memos app on iPhone 7 by taking the following steps.
- Swipe down and in the search box, type “voice memos”.
- Voice memos app should appear on the search results instantly. You can also check the folder name where the app is present.
- For now, tap on Voice Memos icon on the search result to open it immediately.
Why I cannot see Voice Memos app?
If you have the latest iPhone or iOS version, you can access Voice Memos directly from Control Center. However, if you do not see Voice Memos icon, you need to activation Voice Memos first.
Go to Settings and tap on your Apple ID. Go to iCloud option and toggle on Voice Memos option. Now, Voice Memos icon should appear on Control Center for quick access.
How long can voice memos be on iPhone?
There is no limit of recording time when it comes to recording a voice memo or note through Voice Memos app. However, the recording can stop abruptly if there is no more space available on your iPhone.
Also read:
- "\"OBS Recording Tech Breakdown Comparing Leading Screen Recorders\""
- "\"[Updated] In 2024, Capturing Games A Guide to Options Other Than Game Bar\""
- "\"In 2024, Inside Look Free2X's Camera Recording Capabilities\""
- "\"Screen Capture Mastery on Mac Top 10 Apps Reviewed & Rated\""
- "\"[New] 2024 Approved Enhance Live Broadcast Quality with Streamlabs OBS Tips\""
- "\"[Updated] Explore the Best No-Cost Video Meeting Apps - iOS/Android for 2024\""
- "\"[New] Quick Snapshots on Xbox One A User's Manual\""
- "\"[Updated] Best Alternatives Recording Sessions without OBS\""
- "\"[Updated] 2024 Approved How To Capture & Save Your Beloved Hulu Seasons Quickly & Conveniently\""
- "[Updated] Evaluating Bandicam and Camtasia for Mac Users"
- "\"[Updated] 2024 Approved EyeCatcher Ultimate Screen Capture Guide\""
- "\"[New] Unlocking Secrets Your Complete Overview of Stardew and Ginger Isle\""
- "Free & Paid Options to Perfectly Document Every Google Meet"
- "In 2024, Economical Desktop Encoder Software Guide Revealed"
- "\"2024 Approved In-Depth Razer Camera Evaluation\""
- "\"[New] 2024 Approved PeekCapture Review of Low-Res Screen Grabs\""
- "\"SearchingForSmarterCamerasPost-MyCam\""
- "[Updated] In 2024, Balancing Volume Levels in OBS Streaming"
- "\"[Updated] 2024 Approved 10 Best 3Ds Emulator You Can Find on PC\""
- "Decoding the Full Scope of OBS Screen Recorder for 2024"
- "\"[Updated] Audience Wow Factor Best Stream Cameras for Your Twitch Channel\""
- "[New] In 2024, Securing Skype Audio with OBS Recording Techniques"
- "\"[Updated] In 2024, SplitCam Verdict Unrivaled Camera Quality or Not?\""
- "\"FaceTime Call Screen Recording The Beginner's Guide\""
- "The Complete Blueprint for Screen Capture Excellence with Adobe Captivity"
- "\"[New] 2024 Approved Enhancing Presentations The Captivate Way\""
- "[Updated] In 2024, Essential Methodologies in Capturing Web Radio Audio"
- "\"[Updated] Mastering ScreenFlow A Guide to Enhanced Creativity on macOS for 2024\""
- "[New] Practical Steps for Smooth Recording of Remote Workshops on Windows/Apple Systems for 2024"
- "\"[Updated] Perfecting Distance Remote Podcast Capture Techniques\""
- "\"2024 Approved Visual Voyage Documenting Desktop Views on WinOS\""
- "\"Apowersoft Free A Closer Look at Screenshot Capabilities\""
- "[Updated] Decrease Environmental Noise in Video Recordings for 2024"
- "\"[New] 2024 Approved The Ultimate Guide to Superior Liquid Games\""
- In 2024, How to use iSpoofer on Vivo S17? | Dr.fone
- New The Art of Leveraging Tension-Evoking Soundtracks in Cinematic Compositions for 2024
- Updated 2024 Approved Mastering Audio Clarity The Most Effective Noise Reduction Tools Revealed
- New Best Video Editing Software to Remove Audio From Video Windows for 2024
- 2024 Approved The Ultimate List 10 Best Video Trimmers for PC Users
- New 2024 Approved How to Define AI Video?
- New In 2024, The Ultimate Vlog Editors Guide Free and Paid Software for Every Platform
- New Simplifying Vocal Alterations The Audacity Technique for 2024
- In 2024, Full Guide on Mirroring Your OnePlus Ace 2 to Your PC/Mac | Dr.fone
- How Can We Bypass Tecno Camon 20 FRP?
- 2024 Approved Transform Your Videos with Slow Motion on Kapwing A Beginner-Friendly Guide
- Expediting Audio Imports in Premiere Pro A Concise, Step-by-Step Guide for 2024
- How to Come up With the Best Pokemon Team On Apple iPhone 13? | Dr.fone
- Complete Tutorial to Use GPS Joystick to Fake GPS Location On Vivo S17 Pro | Dr.fone
- Updated 2024 Approved Top 10 Animation Software for Creating Stunning Animated Videos
- Open and Repair Doesnt Work in MS Excel
- New MKVtoolnix for macOS A User-Friendly Video Editing Solution
- List of Pokémon Go Joysticks On Nubia Red Magic 9 Pro | Dr.fone
- How to Come up With the Best Pokemon Team On OnePlus Ace 2 Pro? | Dr.fone
- Excel 2021 Stuck at Opening File 0 - Resolve Performance Issues
- New 10 Top Vloggers on YouTube
- Complete Tutorial to Use GPS Joystick to Fake GPS Location On Vivo S17 | Dr.fone
- 5 Most Effective Methods to Unlock iPhone 12 Pro in Lost Mode
- In 2024, A Comprehensive Guide to iPhone 15 Blacklist Removal Tips and Tools
- Updated Must-Have Apps for Real-Time Video Translation for 2024
- In 2024, Quick Steps to Change Weather Location on Apple iPhone 15 Pro Max | Dr.fone
- Best Ways on How to Unlock/Bypass/Swipe/Remove Samsung Galaxy A25 5G Fingerprint Lock
- How to Fix Pokemon Go Route Not Working On Oppo Find X6 Pro? | Dr.fone
- In 2024, Everything You Need To Know About Unlocked Apple iPhone 15 Pro
- In 2024, Make a Lasting Impression How to Design Custom LinkedIn Video Thumbnails
- Updated In 2024, GoPro Quik Vs. The Competition A Review and Alternative Options for PC
- Methods to Change GPS Location On Apple iPhone X | Dr.fone
- Title: "[New] 2024 Approved The Complete Guide to iPhone Voice Memos Setup"
- Author: Amelia
- Created at : 2024-05-19 20:09:09
- Updated at : 2024-05-20 20:09:09
- Link: https://screen-capture.techidaily.com/new-2024-approved-the-complete-guide-to-iphone-voice-memos-setup/
- License: This work is licensed under CC BY-NC-SA 4.0.
