![[New] 2024 Approved How to Record Films Seamlessly Across Tech Devices](https://thmb.techidaily.com/36cb4ddf3fc78c71836e11f4a803426f35040ec4e34c37b6c57cca04ad1d4891.jpg)
"[New] 2024 Approved How to Record Films Seamlessly Across Tech Devices"
How to Record Films Seamlessly Across Tech Devices
You may want to store certain movies you’re viewing on your computer to watch later. Some of these film clips may be useful or necessary for you to save for future reference. Because video streams aren’t always reliable, capturing these video files is the correct method to keep them safe. Because of video recording or capture software, you may now record a movie on your pc at any moment.
Free screen recorders might be an excellent place to start, and several outstanding alternatives are out there. Additionally, you have the option to download or stream the recording to a service of your choosing. Several powerful methods for recording movies will be discussed in this article for PCs, Macs, and smartphones. Please guide you through each stage so that you understand how to record movie.
Part 1. Best Way to Record Movie on PC
Part 2. Record Film on Mac with QuickTime
Part 3. How to Record Movie on the Phone
Part 1. Best Way to Record Movie on PC
PC systems are capable of supporting software items that may be utilized for a variety of various applications. Suppose you want to capture your computer’s screen while using Windows-based applications. In that case, you’ll need an advanced movie screen recorder like Filmora , which allows you to start a new screencasting session in just a few clicks. Here are the step-by-step procedures for doing it.
When you’ve installed the program, double-click on its icon on your desktop to access the Full Feature mode on your computer, select Record PC Screen from the Record menu when the app has started up. Once the Wondershare Screen Recorder window appears, you may edit the parameters for your forthcoming session of screencasting.
For Win 7 or later (64-bit)
For macOS 10.12 or later
On the left-hand side of the Screen Recorder’s window, you’ll find a rectangle icon, which allows you to choose the region of the screen that will be recorded. You have the option of selecting Full Screen, Custom, or Target Window.

You may use the Microphone icon to pick the microphone you’ll be using to record audio, and you can use the Speakers icon to activate or mute the computer’s speakers while the screen recording session is in progress.
The Settings icon may be seen in the window’s bottom right corner; click it to access additional settings. Using the Quality drop-down box, you may specify the location of the recording on your computer’s hard drive, as well as the frame rate and quality.
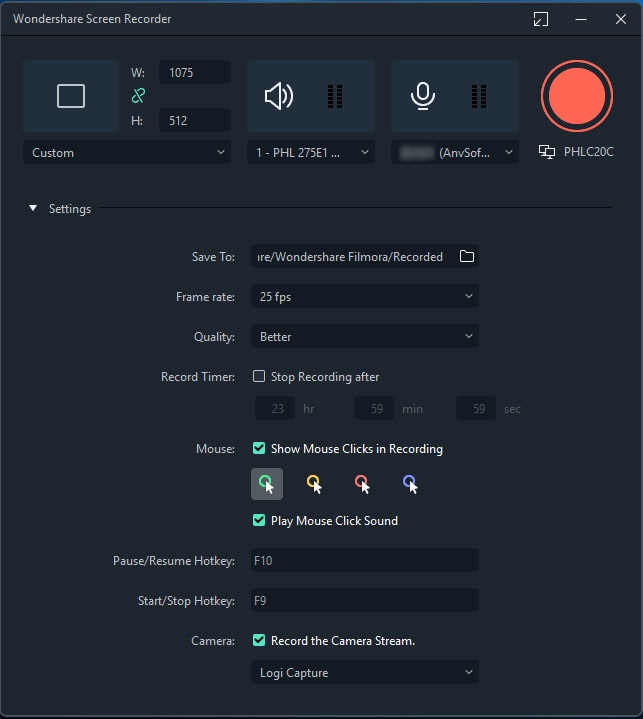
Recording mouse clicks is possible if you choose the Mouse checkbox in the Record Timer box. You can also define the maximum recording time by entering the default screen selected recording length.
After a three-second countdown, click the Rec button to begin a new screencasting session. To stop recording, use the F9 key on the keyboard. The file will be instantly launched in Filmora’s video editor, allowing you to make any necessary edits before publishing it online.
Part 2. Record Film on Mac with QuickTime
If you’re using an earlier version of MacOS than Mojave, you may always use QuickTime Player to record your screen (as well as audio recording). QuickTime recordings aren’t easy to edit, yet they are one of the most straightforward ways to record movie mac. QuickTime Player may be found in Catalina and Big Sur, among other places.
From the Launchpad, open QuickTime Player. Check the Launchpad’s Other folder if you don’t see it. When the app is open, go to the Menu Bar and choose File. On the drop-down menu, select New Screen Recording.
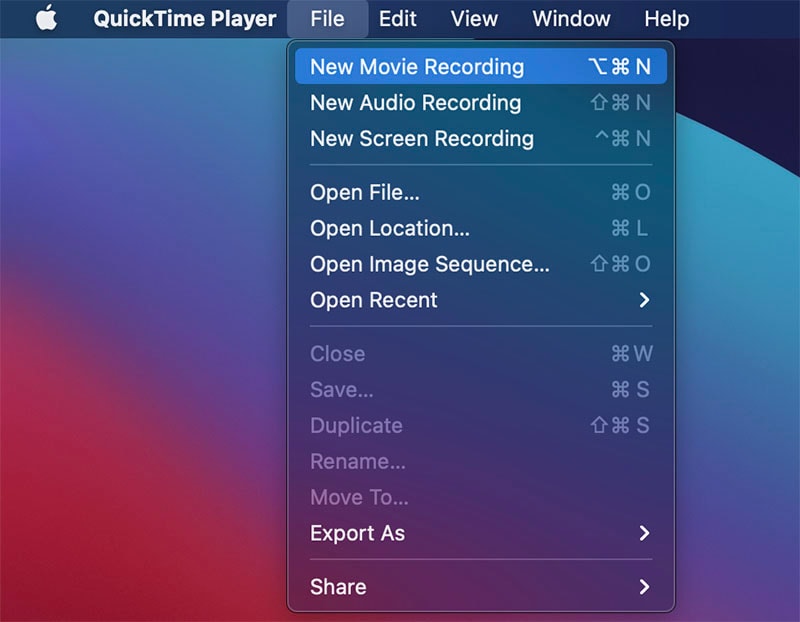
An option to allow screen recording may appear on your computer’s screen. Enter system preferences by clicking Open System Preferences. Select QuickTime Player and check the box. QuickTime Player may need to be restarted. (If you don’t, go on to the next step.) When QuickTime has restarted, go to File, then New Screen Recording.
Three buttons on the left allow you to take a screenshot, while two appear in the center to record the screen. Optional features include the ability to add or delete mouse clicks, the ability to utilize the built-in mic, and the ability to choose the video’s destination. The Record button is positioned to the right of the Record Entire Screen and Record Selected Portion buttons.
When you’re done, go to the menu bar and choose Stop Recording from the drop-down menu, as seen below. If you have a Touch Bar on your Mac, you may also press the relevant icon.
Click File in the menu bar, then Save from the drop-down menu to save your recording. To save the recording, choose a suitable save place (if you’ve not done so) and a name for it, then click Save to confirm.
Part 3. How to Record Movie on the Phone
Nowadays, capturing your phone’s screen is relatively simple. Screen recorders are incorporated into several Android handsets. There are also hundreds of third-party screen recorder programs available for download, both free and premium. If you’re still looking for the finest android movie recorder, you may get the AZ screen recorder app right now. With its built-in technique, though, recording your iPhone’s screen is simple.
For Android
AZ Screen Recorder is the most effective screen recording program I’ve discovered so far on Android, although there are many more others. It’s ad-free, doesn’t need root, has no restriction on recording time, and doesn’t apply watermarks. It’s not a terrible bargain at all. After you’ve downloaded it, go through the following steps:
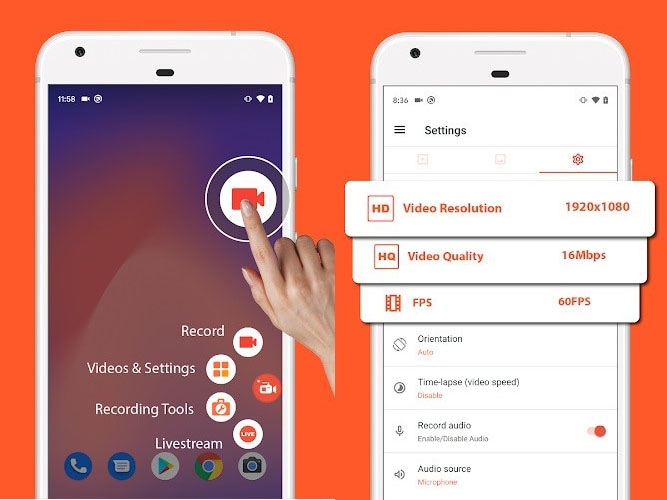
- Start the AZ Screen Recorder app by selecting it from your app drawer.
- You’ll notice a four-button overlay emerge. The gear icon allows you to change the video recording parameters, including resolution, bit rate, and frame rate. Press Back to go to the home screen when you’re finished.
- Start the app or browse to the screen you wish to capture and press “Record”.
- AZ overlay’s AZ button has a red camera shutter icon. The video is about to start recording. Until you’re ready to stop recording, continue to use your phone usually.
- Remove your finger from the notification shade when you’re done. You have the option of pausing or stopping the recording from the AZ notification.
For iOS
Fortunately, if you understand how to activate it, taking a screenshot or recording a video on your iPhone’s screen is exactly as simple as before. Using your iPhone, here’s how to record your screen and locate the movie once it has been saved.
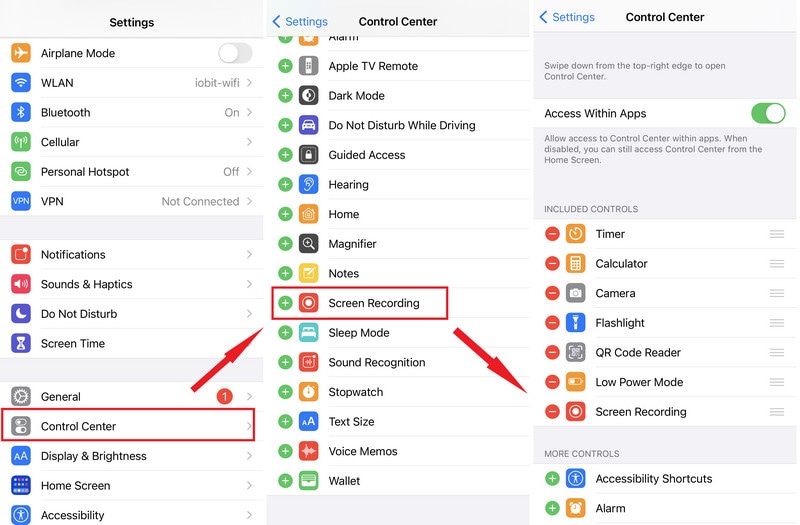
- Then touch “Control Center” in the Settings app. Select “Customize Controls” from the drop-down menu. Look for the phrase “Screen Recording.” Tap the green + symbol next to it if it’s not already in the “Include” section. It should now appear in the “Include” column.
- If you have an iPhone X or later, slide down from the top-right corner to activate the Control Center; swipe up if you have an iPhone 8 or older. The home button on an iPhone may be accessed by swiping up from the bottom of the display.
- Press and hold the “Record” button. This feature is activated by pressing the Record button for three seconds, after which the button becomes red and begins recording. The time will be red in the top left corner, indicating that you’re still recording.
- Press the red time indication at the upper left of the screen, then tap “Stop” to stop recording. Alternatively, you may open the Control Center and press the record button once again.
Wrapping UP
Recording all of your favorite movies on your Mac or PC is now easy and enjoyable. That’s all you’ll need to know about how to record movie on mac and computer, and smartphone. Windows users may edit their screen recordings right away using Filmora, while Mac users have the option of using QuickTime. The purpose of recording a screen is a significant factor in determining which screen capture software you should choose.
Part 2. Record Film on Mac with QuickTime
Part 3. How to Record Movie on the Phone
Part 1. Best Way to Record Movie on PC
PC systems are capable of supporting software items that may be utilized for a variety of various applications. Suppose you want to capture your computer’s screen while using Windows-based applications. In that case, you’ll need an advanced movie screen recorder like Filmora , which allows you to start a new screencasting session in just a few clicks. Here are the step-by-step procedures for doing it.
When you’ve installed the program, double-click on its icon on your desktop to access the Full Feature mode on your computer, select Record PC Screen from the Record menu when the app has started up. Once the Wondershare Screen Recorder window appears, you may edit the parameters for your forthcoming session of screencasting.
For Win 7 or later (64-bit)
For macOS 10.12 or later
On the left-hand side of the Screen Recorder’s window, you’ll find a rectangle icon, which allows you to choose the region of the screen that will be recorded. You have the option of selecting Full Screen, Custom, or Target Window.
You may use the Microphone icon to pick the microphone you’ll be using to record audio, and you can use the Speakers icon to activate or mute the computer’s speakers while the screen recording session is in progress.
The Settings icon may be seen in the window’s bottom right corner; click it to access additional settings. Using the Quality drop-down box, you may specify the location of the recording on your computer’s hard drive, as well as the frame rate and quality.
Recording mouse clicks is possible if you choose the Mouse checkbox in the Record Timer box. You can also define the maximum recording time by entering the default screen selected recording length.
After a three-second countdown, click the Rec button to begin a new screencasting session. To stop recording, use the F9 key on the keyboard. The file will be instantly launched in Filmora’s video editor, allowing you to make any necessary edits before publishing it online.
Part 2. Record Film on Mac with QuickTime
If you’re using an earlier version of MacOS than Mojave, you may always use QuickTime Player to record your screen (as well as audio recording). QuickTime recordings aren’t easy to edit, yet they are one of the most straightforward ways to record movie mac. QuickTime Player may be found in Catalina and Big Sur, among other places.
From the Launchpad, open QuickTime Player. Check the Launchpad’s Other folder if you don’t see it. When the app is open, go to the Menu Bar and choose File. On the drop-down menu, select New Screen Recording.
An option to allow screen recording may appear on your computer’s screen. Enter system preferences by clicking Open System Preferences. Select QuickTime Player and check the box. QuickTime Player may need to be restarted. (If you don’t, go on to the next step.) When QuickTime has restarted, go to File, then New Screen Recording.
Three buttons on the left allow you to take a screenshot, while two appear in the center to record the screen. Optional features include the ability to add or delete mouse clicks, the ability to utilize the built-in mic, and the ability to choose the video’s destination. The Record button is positioned to the right of the Record Entire Screen and Record Selected Portion buttons.
When you’re done, go to the menu bar and choose Stop Recording from the drop-down menu, as seen below. If you have a Touch Bar on your Mac, you may also press the relevant icon.
Click File in the menu bar, then Save from the drop-down menu to save your recording. To save the recording, choose a suitable save place (if you’ve not done so) and a name for it, then click Save to confirm.
Part 3. How to Record Movie on the Phone
Nowadays, capturing your phone’s screen is relatively simple. Screen recorders are incorporated into several Android handsets. There are also hundreds of third-party screen recorder programs available for download, both free and premium. If you’re still looking for the finest android movie recorder, you may get the AZ screen recorder app right now. With its built-in technique, though, recording your iPhone’s screen is simple.
For Android
AZ Screen Recorder is the most effective screen recording program I’ve discovered so far on Android, although there are many more others. It’s ad-free, doesn’t need root, has no restriction on recording time, and doesn’t apply watermarks. It’s not a terrible bargain at all. After you’ve downloaded it, go through the following steps:
- Start the AZ Screen Recorder app by selecting it from your app drawer.
- You’ll notice a four-button overlay emerge. The gear icon allows you to change the video recording parameters, including resolution, bit rate, and frame rate. Press Back to go to the home screen when you’re finished.
- Start the app or browse to the screen you wish to capture and press “Record”.
- AZ overlay’s AZ button has a red camera shutter icon. The video is about to start recording. Until you’re ready to stop recording, continue to use your phone usually.
- Remove your finger from the notification shade when you’re done. You have the option of pausing or stopping the recording from the AZ notification.
For iOS
Fortunately, if you understand how to activate it, taking a screenshot or recording a video on your iPhone’s screen is exactly as simple as before. Using your iPhone, here’s how to record your screen and locate the movie once it has been saved.
- Then touch “Control Center” in the Settings app. Select “Customize Controls” from the drop-down menu. Look for the phrase “Screen Recording.” Tap the green + symbol next to it if it’s not already in the “Include” section. It should now appear in the “Include” column.
- If you have an iPhone X or later, slide down from the top-right corner to activate the Control Center; swipe up if you have an iPhone 8 or older. The home button on an iPhone may be accessed by swiping up from the bottom of the display.
- Press and hold the “Record” button. This feature is activated by pressing the Record button for three seconds, after which the button becomes red and begins recording. The time will be red in the top left corner, indicating that you’re still recording.
- Press the red time indication at the upper left of the screen, then tap “Stop” to stop recording. Alternatively, you may open the Control Center and press the record button once again.
Wrapping UP
Recording all of your favorite movies on your Mac or PC is now easy and enjoyable. That’s all you’ll need to know about how to record movie on mac and computer, and smartphone. Windows users may edit their screen recordings right away using Filmora, while Mac users have the option of using QuickTime. The purpose of recording a screen is a significant factor in determining which screen capture software you should choose.
Also read:
- [New] 2024 Approved Exploring the Functionality of VLC Screencaster
- [New] 2024 Approved Flawless Visual Shifts for Filmmakers
- [New] 2024 Approved Mastering Chroma Key Techniques for Professional Videos
- [New] In 2024, Crafting Compelling OBS Livestreams for Facebook Fans
- [New] In 2024, Top-Ranked Independent Offline Mobile Gaming (Android)
- [New] Rise Above 1000 Subs YouTubing Strategies for Mobile Creators
- [Updated] 2024 Approved Community Cinema Collector
- [Updated] 2024 Approved Proven Strategies for Flawless Xbox Video Capture
- [Updated] Five's Best Quick, Reliable Time-Lapse Tools for 2024
- [Updated] How to Record Teams Video Meeting for 2024
- 2024 Approved Android's Lightroom App A Complete Evaluation
- 3 Facts You Need to Know about Screen Mirroring Samsung Galaxy S23+ | Dr.fone
- 8 Solutions to Solve YouTube App Crashing on Nokia C32 | Dr.fone
- In 2024, Enhancing PS3 Playthroughs A Guide to Effective Capture
- In 2024, The Ultimate Path to Podcast Success Through SEO Excellence
- The Editor's Codex Innovations in Youtube Video Formatting
- Title: [New] 2024 Approved How to Record Films Seamlessly Across Tech Devices
- Author: Amelia
- Created at : 2025-02-26 16:21:30
- Updated at : 2025-03-05 17:49:50
- Link: https://screen-capture.techidaily.com/new-2024-approved-how-to-record-films-seamlessly-across-tech-devices/
- License: This work is licensed under CC BY-NC-SA 4.0.